
Special Tools - Jack: 57001-1238 Jack Attachment: 57001-1608
If roughness or binding is found, replace the hub bearings (see Hub Bearing Removal/Installation).
If there is any damage to the wheel, replace the wheel.
If rim runout exceeds the service limit, check the hub bearings (see Hub Bearing Inspection).
If the problem is not due to the bearings, replace the wheel.
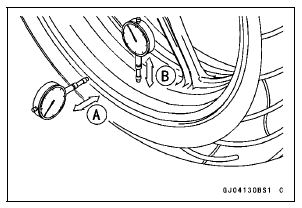
Rim Runout (with tire installed) Standard: Axial TIR 0.5 mm (0.02 in.) or less
Radial TIR 0.8 mm (0.03 in.) or less
Service Limit: Axial TIR 1.0 mm (0.04 in.)
Radial TIR 1.0 mm (0.04 in.)
| WARNING Damaged wheel parts may fail and cause an accident resulting in serious injury or death. Never attempt to repair a damaged wheel part. If the wheel part is damaged, it must be replaced with a new one. |
 Rear Wheel Installation
 Axle Inspection
Water Temperature Sensor Output Voltage Inspection
NOTE
Be sure the battery is fully charged.
Turn the ignition switch to OFF.
Remove the throttle body assy (see Throttle Body Assy
Removal in the Fuel System (DFI) chapter).
Disconnect the water temperature sensor connector and
connect the measuring adapter [A] between these connectors
...
Drive Chain
The drive chain slack and lubrication
must be checked each day before riding
the motorcycle and must be maintained
in accordance with the Periodic
Maintenance Chart for safety and to
prevent excessive wear. If the chain
becomes badly worn or maladjusted -
either too loose or too tight - the c ...
Sport-kawasaki traction control (s-ktrc)
S-KTRC is an intelligent system that
calculates the slip level of the rear
wheel (wheelspin) and is suitable for
sports riding conditions. S-KTRC is
designed to function on public roads.
Acceleration may be delayed under
certain circumstances depending on
road conditions. S-KTRC cannot resp ...