
Clutch Operation Inspection
If the gap is too wide, the clutch may not release fully. If the gap is too narrow, the clutch may not engage fully. In either case, adjust it.
Clutch Lever Free Play
Standard: 2  3 mm (0.08
 0.12 in.)

| WARNING The engine and exhaust system get extremely hot during normal operation and can cause serious burns. Never touch the engine or exhaust pipe during clutch adjustment. |
 6 mm (0.16
 0.24 in.) [B]

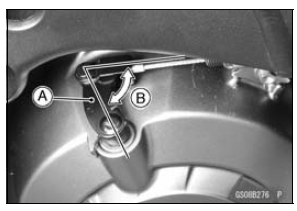
At this time, the release lever should have the proper angle shown.
60° [B]
If the angle is wrong, check the clutch and release parts for wear.
| WARNING Too much cable play can prevent clutch disengagement and cause an accident resulting in serious injury or death. When adjusting the clutch or replacing the cable, be sure the upper end of the clutch outer cable is fully seated in its fitting, or it could slip into place later, creating enough cable play to prevent clutch disengagement. |
 Air Suction System Damage Inspection
 Wheels/Tires
Oxygen Sensor Heater Resistance Inspection
Turn the ignition switch to OFF.
Remove the fuel tank (see Fuel Tank Removal in the Fuel
System (DFI) chapter).
Disconnect the oxygen sensor lead connector [A].
Connect a digital meter [A] to the terminals in the oxygen
sensor lead connector [B].
Measure the oxygen sensor heat ...
High Speed Compression Damping Adjustment
Turn the high speed compression
damping force adjuster clockwise to
increase damping force or counterclockwise
to decrease it.
NOTICE
Do not turn the compression
damping force adjuster beyond
the fully seated position or the
adjusting mechanism may be
damaged.
A. Compression Da ...
Steering Stem Warp Inspection
Whenever the steering stem is removed, or if the steering
can not be adjusted for smooth action, check the steering
stem for straightness.
If the steering stem [A] is bent, replace the steering stem.
Stem Cap Deterioration, Damage Inspection
Replace the stem cap if its oil seal [A] s ...