
NOTE
Be sure the battery is fully charged.
Special Tool - Throttle Sensor Setting Adapter #1: 57001 -1400
Exhaust Butterfly Valve Actuator Sensor Input Voltage Connections to Adapter: Digital Meter (+) → Y/W (actuator W) lead Digital Meter (−) → BK/BL (actuator BK) lead
Input Voltage
Standard: DC 4.75  5.25 V
If the reading is within the standard, check the output voltage (see Exhaust Butterfly Valve Actuator Sensor Output Voltage Inspection).
If the reading is out of the standard, remove the ECU and check the wiring for continuity between main harness connectors.
Disconnect the ECU and sensor connectors.
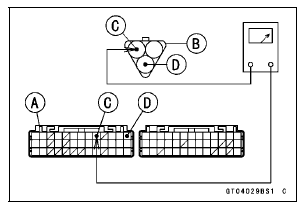
Wiring Inspection ECU Connector [A] ←→ Exhaust Butterfly Valve Actuator Sensor Connector [B] BL lead (ECU terminal 9) [C] BR/BK lead (ECU terminal 13) [D]
If the wiring is good, check the ECU for its ground and power supply (see ECU Power Supply Inspection in the Fuel System (DFI) chapter).
If the ground and power supply are good, replace the ECU (see ECU Removal/Installation in the Fuel System (DFI) chapter).
 Exhaust Butterfly Valve Actuator Sensor (Service Code 34)
 Exhaust Butterfly Valve Actuator Sensor Output Voltage Inspection
How Do I Get Warranty Service?
If there is a problem with your vehicle within the limited warranty period,
you will
need to schedule a service appointment and provide any maintenance records to
an authorized Kawasaki dealer for inspection and diagnosis. You can go to any
Kawasaki dealer for warranty repairs. Your Kawasaki de ...
Inquiries to Rider
Each rider reacts to problems in different ways, so it is important to
confirm what kind of condition
the rider is dissatisfied with.
Try to find out exactly what problem occurs under exactly what
conditions by asking the rider; knowing
this information may help you reproduce the prob ...
ESD (Electronic Steering Damper) ECU Error (Service Code E3b, ZX1000JD/KD)
If this service code appears, check that the following parts
are correctly.
Crankshaft Sensor
Gear Position Switch
Starter Lockout Switch
Main Throttle Sensor
Rear Wheel Rotation Sensor
If these parts are normal, check the ESD ECU for its
ground and power supply (see ESD ECU Power Supply
...