
11. ZX1000JD/KD AD: Apply adhesive.
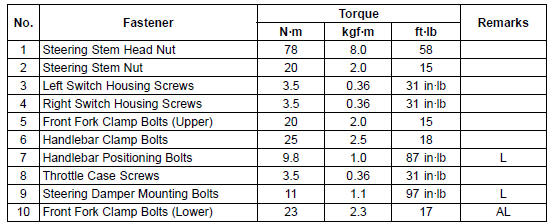
AL: Tighten the two clamp bolts alternately two times to ensure even tightening torque.
G: Apply grease.
L: Apply a non-permanent locking agent.
Specifications

 Steering
 Special Tools
Rocker Arm Removal
Squeeze the brake lever slowly and hold it with a band.
Remove the front footpeg bracket bolts.
Raise the rear wheel off the ground with the jack (see
Rear Shock Absorber Removal).
Special Tools - Jack: 57001-1238
Jack Attachment: 57001-1608
Remove:
Lower Rear Shock Absorber B ...
Exploded View
5. Other than US, CA, and CAL Models
6. The big diameter side of the dampers faces upward.
G: Apply grease.
L: Apply a non-permanent locking agent.
R: Replacement Parts
S: Follow the specified tightening sequence.
SS: Apply silicone sealant.
11. Immobilizer Ampli ...
Meter Unit Circuit (ZX1000K Model)
1. Ignition Switch
2. Joint Connector F
3. Stop Watch Button
4. Oil Pressure Switch
5. Crankshaft Sensor
6. Water Temperature Sensor
7. Gear Position Switch
8. Intake Air Temperature Sensor
9. ESD ECU (ZX1000JD/KD)
10. ECU
11. Rear Wheel Rotation Sensor
12. Frame Ground 1
13. Engine ...