
NOTE
The free play adjustment is performed by replacing the steel plate(s).
Spring Plate Free Play
Usable Range: 0.05  0.70 mm (0.002
 0.028 in.)
Replace the following steel plate(s).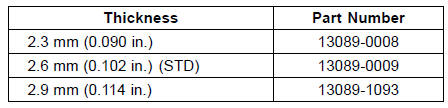
NOTE
Do not use the steel plate of 2.3 mm (0.090 in.) and 2.9 mm (0.114 in.) thickness at the same time.
Clutch Plate Assembly Length (Reference Information)
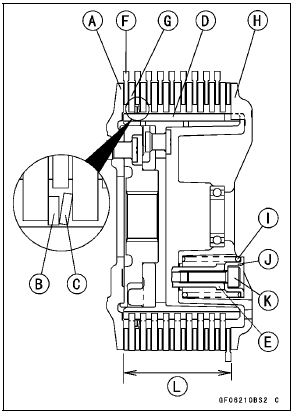
Clutch Hub [A] Spring Seat [B] Spring [C] Sub Clutch Hub [D] Sub Clutch Hub Bolts [E] New Friction Plates [F] Steel Plates [G] Spring Plate [H] Clutch Springs [I] Clutch Spring Holders [J] Clutch Spring Bolts [K]
Torque - Clutch Spring Bolts: 11 N·m (1.1 kgf·m, 97 in·lb)
Clutch Plate Assembly Length (Reference) 53.5 mm (2.11 in.)
NOTE
The length of the clutch plate assembly changes by the steel plate thickness.
 Spring Plate Free Play Measurement
 Clutch Plate, Wear, Damage Inspection
Valve Clearance Inspection
NOTE
Valve clearance must be checked and adjusted when
the engine is cold (at room temperature).
Remove:
Crankshaft Sensor Cover (see Crankshaft Sensor Removal
in the Electrical System chapter)
Cylinder Head Cover (see Cylinder Head Cover Removal
in the Engine Top End chapter)
Turn t ...
External Shift Mechanism Removal
Remove:
Shift Lever (see Shift Pedal Removal)
Oil Pump Drive Gear (see Oil Pump Drive Gear Removal/
Installation in the Engine Lubrication System
chapter)
Circlip [A]
Washer [B]
Special Tool - Outside Circlip Pliers: 57001-144
Remove:
Shift Shaft Assembly [A]
Washer [B] ...
Rider’s Seat Installation
Insert the tabs on the front of the
rider’s seat into the slots in the frame
and secure the seat with mounting
bolts.
Install the seat cover and bolts.
A. Rider’s Seat
B. Tabs
C. Slots
D. Stays ...