
Front Wheel Rotation Sensor Signal Inspection
The front wheel rotation sensor sends the signal to the ECU through the KIBS hydraulic unit (KIBS equipped models). For other than KIBS equipped models, the signal is sent directly to the ECU.
The ECU uses the wheel rotation sensor signal for KTRC control.
The service code 27 is detected with the ECU.
Service Code b 42 (see Front Wheel Rotation Sensor Signal Abnormal) Service Code b 43 (see Front Wheel Rotation Sensor Wiring Inspection)
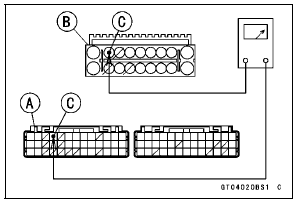
Special Tool - Hand Tester: 57001-1394 Wiring Continuity Inspection ECU Connector [A] ← → KIBS ABS Hydraulic Unit Connector [B] G/Y lead (ECU terminal 4, KIBS Hydraulic Unit terminal 8) [C]
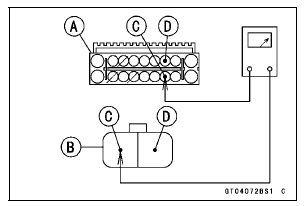
Wiring Continuity Inspection KIBS Hydraulic Unit Connector [A] ← → Front Wheel Rotation Sensor Connector [B] W lead (KIBS Hydraulic Unit Connector terminal 12) [C] Y lead (KIBS Hydraulic Unit Connector terminal 3) [D]
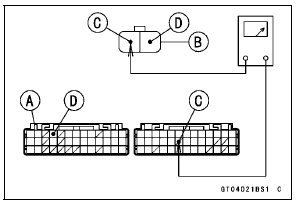
Special Tool - Hand Tester: 57001-1394 Wiring Continuity Inspection ECU Connector [A] ← → Front Wheel Rotation Sensor Connector [B] R lead (ECU terminal 58) [C] G/Y lead (ECU terminal 4) [D]
Front Resistor Resistance (in Main Harness)
Connections:
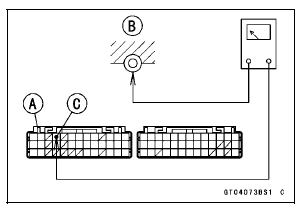
ECU Connector [A] ← → Ground [B]
G/Y lead (ECU terminal 4) [C]
Standard: 209  231 Ω
231 Ω
If the resistance is out of the standard, replace the main harness.
If the wiring is good, check the ECU for its ground and power supply (see ECU Power Supply Inspection in the Fuel System (DFI) chapter).
If the ground and power supply are good, replace the ECU (see ECU Removal/Installation in the Fuel System (DFI) chapter).
Wheel Rotation Sensor Circuit (KIBS Equipped Models)
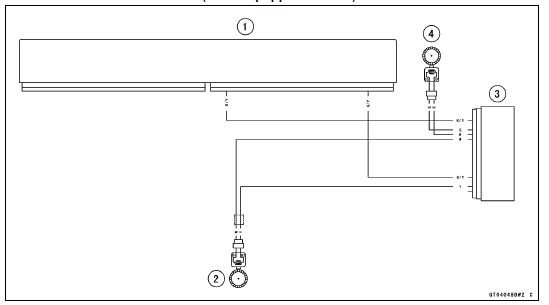
1. ECU
2. Front Wheel Rotation Sensor
3. KIBS Hydraulic Unit
4. Rear Wheel Rotation Sensor
Wheel Rotation Sensor Circuit (other than KIBS Equipped Models)
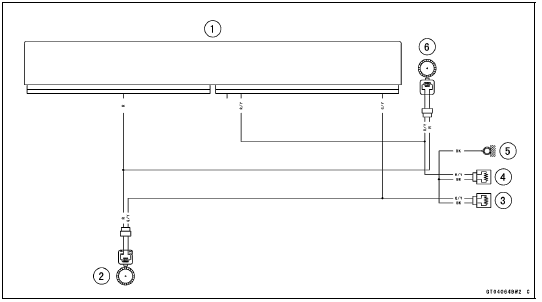
1. ECU
2. Front Wheel Rotation Sensor
3. Resistor F 220 Ω
4. Resistor R 220 Ω
5. Frame Ground 3
6. Rear Wheel Rotation Sensor
This sensor has a weight [A] with two magnets inside,
and sends a signal to the ECU. But when the motorcycle
banks 60  70° or more to either
side (in fact falls down),
the weight turns and the signal changes. The ECU senses
this change, and stops the fuel pump relay, the fuel injectors
and the ignition system.
Hall IC [B] When the motorcycle is down, the ignition switch is left ON. If the starter button is pushed, the electric starter turns but the engine does not start. To start the engine again, raise the motorcycle, turn the ignition switch to OFF, and then turn it to ON.
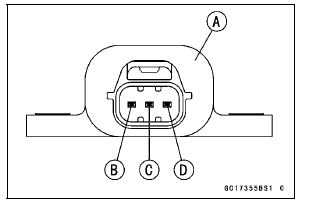
Vehicle-down Sensor [A] Ground Terminal [B]: BR/BK Output Terminal [C]: Y/G Input Terminal [D]: BL
 Gear Position Switch Output Voltage Inspection
Current Mileage
This display mode shows the current
mileage by numerical value. The current
mileage display is renewed every
4 seconds.
A. Current Mileage
B. “km/L”
NOTE
The display unit modes can be
changed, refer to the “Unit Setting”
item in this section.
The numerical value shows “ ...
Amplifier Input Voltage Inspection
NOTE
Be sure the battery is fully charged.
Turn the ignition switch to OFF.
Remove the upper fairing (see Upper Fairing Removal in
the Frame chapter).
Do not disconnect the connectors.
Connect a digital meter to the amplifier connector [A] with
needle adapter set.
Special To ...
Maintenance and adjustment
The maintenance and adjustments outlined in this chapter must be carried
out in
accordance with the Periodic Maintenance Chart to keep the motorcycle in good
running condition. The initial maintenance is vitally important and must not be
neglected.
With a basic knowledge of mechanics and the ...
