
NOTE
Be sure the battery is fully charged.
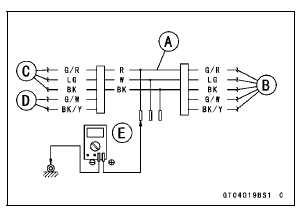
Main Harness [B] To Gear Position Switch [C] To Sidestand Switch [D]
Special Tool - Measuring Adapter: 57001-1700
Gear Position Switch Output Voltage Connections to Adapter: Digital Meter (+) → R (sensor G/R) lead Digital Meter (–) → Frame Ground terminal
When changing the gear position from lower gear to higher gear, raise the rear wheel off the ground with a suitable stand and rotate the rear wheel by hand.
Output Voltage at 1  6 Gear
Positions
Standard:
1st About DC 3.0 V
2nd About DC 2.5 V
3rd About DC 2.0 V
4th About DC 1.5 V
5th About DC 1.1 V
6th About DC 0.7 V
Turn the ignition switch to OFF
If the reading is out of the standard, check the wiring for continuity, using the wiring diagram in this section.
Special Tool - Hand Tester: 57001-1394
If the wiring is good, check the ECU for its ground and power supply (see ECU Power Supply Inspection in the Fuel System (DFI) chapter).
If the ground and power supply are good, replace the ECU (see ECU Removal/Installation in the Fuel System (DFI) chapter).
Gear Position Switch Circuit
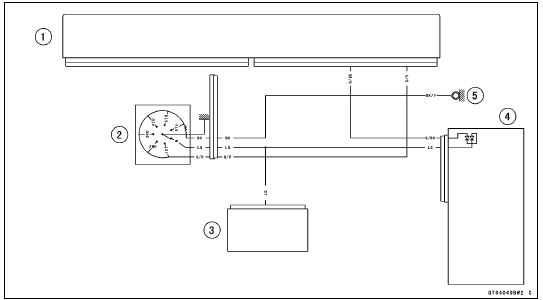
1. ECU
2. Gear Position Switch
3. Meter Unit
4. Relay Box
5. Frame Ground 1
 Gear Position Switch Removal/Installation
 Front Wheel Rotation Sensor Signal (Service Code 27)
Intake Air Temperature Sensor Removal
NOTICE
Never drop the intake air temperature sensor especially
on a hard surface. Such a shock to the sensor
can damage it.
Remove the fuel tank (see Fuel Tank Removal in the Fuel
System (DFI) chapter).
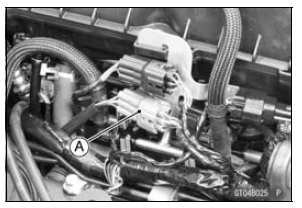
Disconnect the connector [A] from the intake air temperature
sensor.
Remove the da ...
Lower Fairing Removal
Remove the quick rivets [A].
Remove:
Quick Rivets [A]
Bolts [B]
Pull up the core by the flat-head screwdriver (–), and then
remove the quick rivet.
Clear the hook portions on the upper edges [C] from the
slots, and remove the left lower fairing [D].
While pulling down ...
Throttle Control System Inspection
Check the throttle grip free play [A].
If the free play is incorrect, adjust the throttle cables.
Throttle Grip Free Play
Standard: 2 3 mm (0.08
0.12 in.)
Check that the throttle grip [B] moves smoothly from full
open to close, and the throttle closes quickly and completely
by the ...