
NOTICE
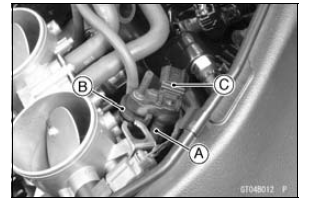
Never drop the intake air pressure sensor #1 especially on a hard surface. Such a shock to the sensor can damage it.
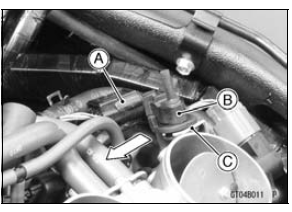
Disconnect the vacuum hose [A] and remove the rubber damper [B] from the intake air pressure sensor #1 [C].
 Intake Air Pressure Sensor #1 Installation
Spark Plug Replacement
Remove the stick coils (see Stick Coil Removal in the
Electrical System chapter).
Remove the spark plugs using the 16 mm (0.63 in.) plug
wrench [A] vertically.
Replace the spark plug with new ones.
Standard Spark Plug
Type: NGK CR9EIA-9
Insert the spark plug vertically into the sp ...
Tie-Rod and Rocker Arm Bearing Removal
Remove:
Tie-Rod (see Tie-Rod Removal)
Rocker Arms (see Rocker Arm Removal)
Swingarm (see Swingarm Removal)
Sleeves [A]
Oil Seals [B]
Remove the needle bearings [C], using the bearing remover
head and bearing remover shaft.
Special Tools - Bearing Remover Head,
15 ×
17: ...
Meter Operation Inspection
Check 1-1: Switching Inspection
Turn the ignition switch to ON and check the following.
The all LCD segments [A] appear for 3 seconds.
The warning indicator light (Red LED) [B] goes on for 3
seconds and then goes off in a moment after that goes
off.
The warning indicator light (Yellow LED ...
