
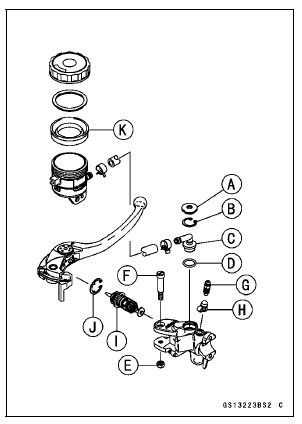
Front Master Cylinder Disassembly
Special Tool - Inside Circlip Pliers: 57001-143
Remove the dust cover and push rod.
Remove the circlip [J]
Pull out the piston (with primary cup and secondary cup).
Remove the return spring and spring guide.
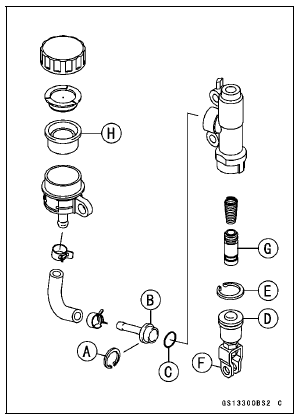
Rear Master Cylinder Disassembly
Special Tool - Inside Circlip Pliers: 57001-143
Master Cylinder Assembly
NOTICE
Except for the disc pads and disc, use only disc brake fluid, isopropyl alcohol, or ethyl alcohol for cleaning brake parts. Do not use any other fluid for cleaning these parts. Gasoline, engine oil, or any other petroleum distillate will cause deterioration of the rubber parts. Oil spilled on any part will be difficult to wash off completely, and will eventually deteriorate the rubber used in the disc brake.
Front: Brake Lever Pivot Bolt
Rear: Dust Cover of Push Rod Assembly
Torque - Brake Lever Pivot Bolt: 1.2 N·m (0.12 kgf·m, 11 in·lb) Brake Lever Pivot Bolt Locknut: 5.9 N·m (0.60 kgf·m, 52 in·lb)
Torque - Front Master Cylinder Bleed Valve: 5.4 N·m (0.55 kgf·m, 48 in·lb)
 Brake Fluid Change
 Caliper Rubber Parts Replacement
General Precautions
Frequent and proper care of your
Kawasaki motorcycle will enhance
its appearance, optimize overall performance,
and extend its useful life.
Covering your motorcycle with a high
quality, breathable motorcycle cover
will help protect its finish from harmful
UV rays, pollutants, and reduce the ...
Rear Frame Front Removal
Remove:
Rear Frame Rear (see Rear Frame Rear Removal)
Rear Fender Front (see Rear Fender Front Removal)
Rear Footpeg Bracket Bolts [A]
Rear Footpeg Bracket [B]
Rear Frame Front Bolts [C]
Left Rear Frame Front [D]
Remove:
Rear Footpeg Bracket Bolts [A]
Rear Footpeg Bracke ...
Fuel Tank Removal
WARNINGGasoline is extremely flammable and can be
explosive
under certain conditions, creating the
potential for serious burns. Make sure the area is
well-ventilated and free from any source of flame
or sparks; this includes any appliance with a pilot
light. Do not smoke. T ...