
NOTE
Be sure the battery is fully charged.
Main Harness [B] Oxygen Sensor [C]
Special Tool - Measuring Adapter: 57001-1700
Oxygen Sensor Heater Power Source Voltage Connections to Adapter: Digital Meter (+) → R (main harness W/R) lead Digital Meter (–) → Frame Ground terminal
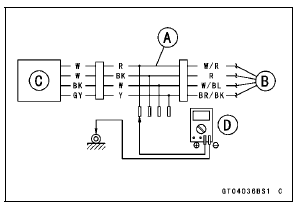
Power Source Voltage Standard: Battery Voltage
If the reading is in specification, but the problem still exists, replace the ECU (see ECU Removal/Installation in the Fuel System (DFI) chapter).
If the reading is out of the standard, check the following.
ECU Relay Fuse 15 A (see Fuse Inspection in the Electrical System chapter) Power Source Wiring (see Oxygen Sensor Circuit)
If the fuse and wiring are good, remove the ECU and check the wiring for continuity between harness connectors.
Special Tool - Hand Tester: 57001-1394
Disconnect the ECU and sensor connectors.

Wiring Continuity Inspection ECU Connector [A] ←→ Oxygen Sensor Connectors [B] R lead (ECU terminal 76) [C]
If the wiring is good, check the ECU for its ground and power supply (see ECU Power Supply Inspection in the Fuel System (DFI) chapter).
If the ground and power supply are good, replace the ECU (see ECU Removal/Installation in the Fuel System (DFI) chapter).
Oxygen Sensor Circuit
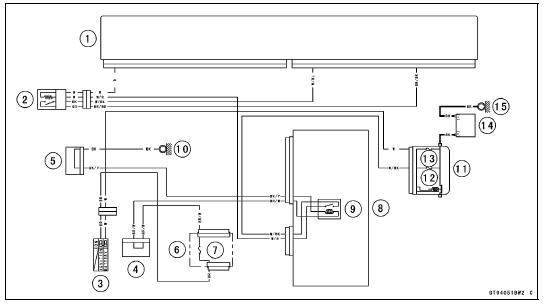
1. ECU
2. Oxygen Sensor
3. Ignition Switch
4. Joint Connector F
5. Joint Connector A
6. Fuse Box 1
7. Ignition Fuse 15 A
8. Relay Box
9. ECU Main Relay
10. Frame Ground 3
11. Starter Relay
12. ECU Fuse 15 A
13. Main Fuse 30 A
14. Battery
15. Engine Ground
 Oxygen Sensor Heater Resistance Inspection
 KIBS Hydraulic Unit Communication Error (Service Code 1b, KIBS Equipped
Models)
KIBS Hydraulic Unit Communication Error (Service Code 1b, KIBS Equipped
Models)Spring Preload Adjustment
Remove the rear shock absorber from the frame (see
Rear Shock Absorber Removal).
Loosen the locknut and turn out the adjusting nut to free
the spring.
Special Tools - Hook Wrench T=3.2 R37: 57001-1539
Hook Wrench R=35: 57001-1580
To adjust the spring preload, turn in the adjusting n ...
Check 2-3: Intake Air Temperature Inspection
Disconnect the intake air temperature sensor connector
[A] (see Intake Air Temperature Sensor Removal in the
Self-Diagnosis System chapter).
Connect the variable rheostat [B] to the R/BK lead [C] and
BR/BK lead [D] terminals.
Turn the ignition switch to ON.
Read the temperatur ...
Side Stand
The motorcycle is equipped with a
side stand.
A. Side Stand
NOTE
When using the side stand, turn the
handlebar to the left.
Do not sit on the motorcycle while
it is on its side stand or centre stand.
Always kick the stand fully up before
sitting on the motorcycle.
NOTE
The motorcycl ...