
NOTICE
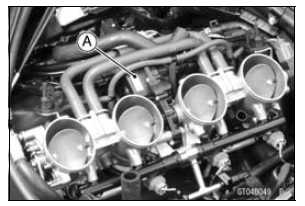
Do not remove the subthrottle valve actuator [A] since it has been adjusted and set with precision at the factory.
Never drop the throttle body assy especially on a hard surface. Such a shock to the subthrottle valve actuator can damage it.
 Subthrottle Valve Actuator Inspection
Premuffler Chamber Removal
Remove:
Muffler Body (see Muffler Body Removal)
Right Lower Fairing (see Lower Fairing Removal in the
Frame chapter)
Front Seat (see Front Seat Removal in the Frame chapter)
Oxygen Sensor (Equipped Models) (see Oxygen Sensor
Removal (Equipped Models) in the Electrical System
chapter ...
Engine Removal
Support the rear part of the swingarm with a stand.
Squeeze the brake lever slowly and hold it with a band
[A].
WARNINGMotorcycle may fall over unexpectedly
resulting in
an accident or injury. Be sure to hold the front brake
when removing the engine.
NOTICE
Be sure ...
Air Switching Valve Removal
NOTICE
Never drop the air switching valve especially on a
hard surface. Such a shock to the air switching
valve can damaged it.
Remove the air cleaner housing (see Air Cleaner Housing
Removal in the Fuel System (DFI) chapter).
Disconnect the connector [A].
Disconnect the hoses [B] from ...
