
If the transmission assy is to be disassembled, remove the following.
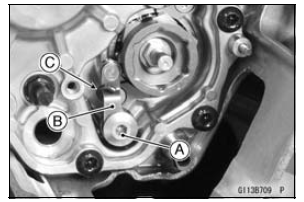
Shift Ratchet Assembly and Holder Gear Positioning Lever Bolt [A] Gear Positioning Lever [B], Spring [C] and Collar
 Transmission
 Transmission Assy Disassembly
Race Mode Display
This mode gives priority to reading
the gear position rather than the
speedometer reading.
The gear position indicator can
be displayed at the position of the
speedometer on the normal mode.
Also the speedometer is displayed instead
of the clock on the normal mode.
This mode can be used ...
Gear Position Switch Installation
Securely place the springs [A] and pins [B] into the holes
[C] of the shift drum.
Apply grease to the new O-ring [D].
Install the gear position switch [E].
Apply a non-permanent locking agent to the threads of
the gear position switch screws [F].
Tighten:
Torque - Gear Position Swit ...
External Shift Mechanism Installation
Install the gear positioning lever [A] as shown in the figure.
Install:
Spring [B]
Washer [C]
Tighten:
Torque - Gear Positioning Lever Bolt [D]: 12 N·m (1.2 kgf·m,
106 in·lb)
Assemble:
Ratchet [A]
Pawls [B]
Pins [C]
Springs [D]
Install the shift ratchet ...