
Align the punch mark [A] on the weight and the projection [B] on the crankcase.
Engage the balancer gear and the crankshaft gear.
Insert the balancer shaft until it is bottomed.
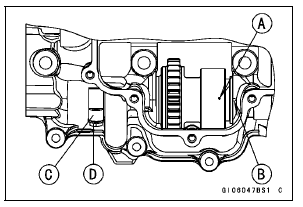
 Balancer Assemble
 Balancer Adjustment
Oil Cooler Installation
Replace the O-ring [A] with a new one.
Apply grease to the new O-ring.
Install the water hoses and hose clamps [A] as shown in
the figure.
Water Hose (About 300 mm, 11.8 in.) [B]
Water Hose (About 130 mm, 5.1 in.) [C]
Yellow Paint [D]
Tighten:
Torque - Water Hose Clamp S ...
Cylinder Compression Measurement
NOTE
Use the battery which is fully charged.
Warm up the engine thoroughly.
Stop the engine.
Remove the spark plugs (see Spark Plug Replacement in
the Periodic Maintenance chapter).
Attach the compression gauge [A] and adapter [B] firmly
into the spark plug hole.
Using the startermo ...
Air Intake Duct Removal
Remove:
Upper Fairing Assembly (see Upper Fairing Assembly
Removal in the Frame chapter)
Meter Bracket (see Meter Unit Removal/Installation in
the Electrical System chapter)
Immobilizer Amplifier [A] (Equipped Models) (see Immobilizer
System Parts Replacement in the Electrical System
...