
Special Tool - Outside Circlip Pliers: 57001-144
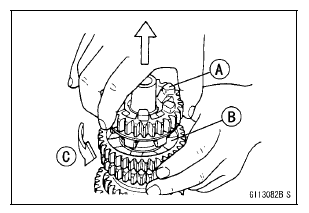
The 5th gear [A] on the output shaft has three steel balls assembled into it for the positive neutral finder mechanism.
Remove the 5th gear as follows.

Set the output shaft in a vertical position holding the 3rd gear [B].
Spin the 5th gear quickly [C] and pull it off upward.
 Transmission Assy Installation
 Transmission Shaft Assembly
Shifting Gears
Close the throttle while pulling in the
clutch lever.
Shift into the next higher or lower
gear.
Open the throttle part way, while releasing
the clutch lever.
For smooth riding, each gear position
should cover the proper rate of speed
shown in the table.
WARNINGDownshifti ...
Crankshaft Sensor Installation
Apply a non-permanent locking agent to the crankshaft
sensor bolts [A].
Tighten:
Torque - Crankshaft Sensor Bolts: 5.9 N·m (0.60 kgf·m, 52
in·lb)
Using a high flash-point solvent, clean off any oil or dirt
that may be on the silicone sealant coating area. Dry
them with a clean cl ...
Throttle Body Assy Assembly
Before assembling, blow away dirt or dust from the throttle
body and delivery pipe assy by applying compressed air.
Replace the O-rings [A] of the joint pipe [B] with new ones.
Apply engine oil to the new O-rings, and insert it to the
delivery pipes [C].
Insert the joint pipe so th ...