
Fit the steel balls into the 5th gear holes in the output shaft.
5th Gear [A] Output Shaft [B] Steel Balls [C]
NOTICE
Do not apply grease to the balls to hold them in place. This will cause the positive neutral finder mechanism to malfunction.
After assembling the 5th gear with steel balls in place on the output shaft, check the ball-locking effect that the 5th gear does not come out of the output shaft when moving it up and down by hand.
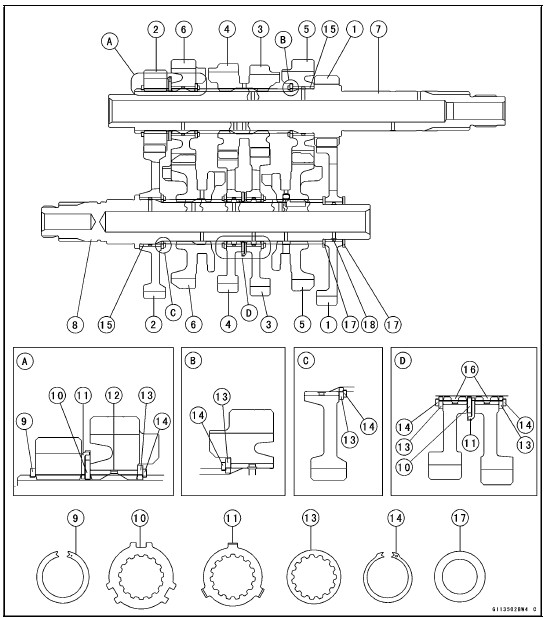
1. 1st Gear
2. 2nd Gear
3. 3rd Gear
4. 4th Gear
5. 5th Gear
6. 6th (Top) Gear
7. Drive Shaft
8. Output Shaft
9. Circlip (Turn the punch mark to the gear.)
10. Toothed Washer
11. Toothed Washer
12. Toothed Bushing, L = 15 mm (0.60 in.)
13. Toothed Washer
14. Circlip (Turn the punch mark to the washer.)
15. Bushing,  31 mm (1.2 in.)
16. Toothed Bushing, L = 9.4 mm (0.37 in.)
17. Washer
18. Bushing,  25 mm (1.0 in.)
Shift Drum and Fork Removal
Refer to the Transmission Assy Disassembly.
Shift Drum and Fork Installation
Refer to the Transmission Assy Assembly.
 Transmission Shaft Disassembly
 Shift Drum Disassembly
Wheel Bearing Damage Inspection
Raise the front wheel off the ground with the jack (see
Front Wheel Removal in the Wheels/Tires chapter).
Special Tools - Jack: 57001-1238
Jack Attachment: 57001-1608
Turn the handlebar all the way to the right or left.
Inspect the roughness of the front wheel bearing by moving
[A] ...
Water Pump Housing Assembly
NOTICE
Do not reuse the mechanical seal and oil seal.
Apply high-temperature grease to the new oil seal lips [A].
Press the new oil seal into the housing with a bearing
driver [B] until it stops at the bottom surface [C] of the
housing.
Special Tool - Bearing Driver Set: 57001-1129
...
Idle Speed Control Valve Actuator Resistance Inspection
Turn the ignition switch to OFF.
Remove the air cleaner housing (see Air Cleaner Housing
Removal in the Fuel System (DFI) chapter).
Disconnect the idle speed control valve actuator connector
[A].
Connect a digital meter to the idle speed control valve
actuator connector [A]
...