
Special Tool - Measuring Adapter: 57001-1700
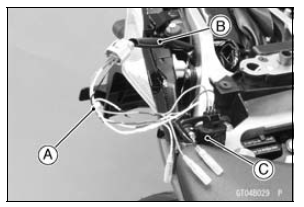
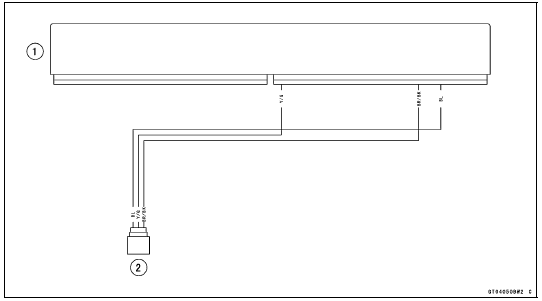
Main Harness [B] Vehicle-down Sensor [C]
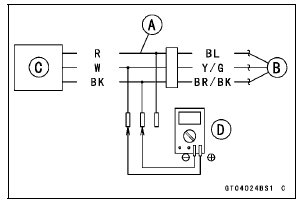
Vehicle-down Sensor Output Voltage Connections to Adapter: Digital Meter (+) → W (sensor Y/G) lead Digital Meter (–) → BK (sensor BR/BK) lead
 70° or
Output Voltage
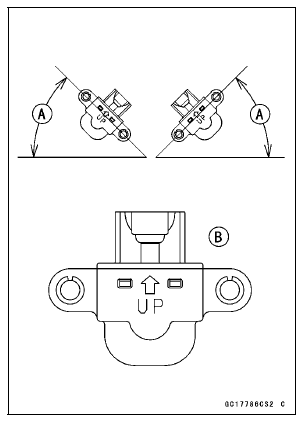
Standard: With sensor tilted 60 
70° or more right or
left: DC 0.65  1.35 V
With sensor arrow mark pointed up: DC
3.55  4.45 V
If the reading is out of the standard, replace the sensor.
If the reading is within the standard, remove the ECU and check the wiring for continuity between main harness connectors.
Special Tool - Hand Tester: 57001-1394
Disconnect the ECU and sensor connectors.
Wiring Continuity Inspection ECU Connector [A] ←→ Vehicle-down Sensor Connector [B] Y/G lead (ECU terminal 38) [C] BR/BK lead (ECU terminal 13) [D]
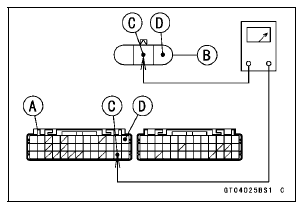
If the wiring is good, check the ECU for its ground and power supply (see ECU Power Supply Inspection in the Fuel System (DFI) chapter).
If the ground and power supply are good, replace the ECU (see ECU Removal/Installation in the Fuel System (DFI) chapter).
Vehicle-down Sensor Circuit
1. ECU
2. Vehicle-down Sensor
 Vehicle-down Sensor Input Voltage Inspection
 Subthrottle Sensor (Service Code 32)
Crankshaft Sensor Peak Voltage Inspection
NOTE
Be sure the battery is fully charged.
Using the peak voltage adapter [A] is more reliable way
to determine the condition of the crankshaft sensor than
crankshaft sensor internal resistance measurements.
Disconnect the crankshaft sensor lead connector (see
Crankshaft Sensor ...
Canister Inspection
Refer to the Evaporative Emission Control System Inspection
(CAL and SEA-B1 Models) in the Periodic Maintenance
chapter.
1. Green Hoses (Purge)
2. Fittings
3. Canister
4. White Hose (Vacuum)
5. Throttle Body Assy
6. Fuel Tank
7.Red Hose (Return)
8. Blue Hose (Breather)
9. Brack ...
Connecting Rod Twist Inspection
With the big-end arbor [A] still on V block [C], hold the
connecting rod horizontally and measure the amount that
the arbor [B] varies from being paralleled with the surface
plate over a 100 mm (3.94 in.) length of the arbor to determine
the amount of connecting rod twist.
If the conne ...