
Torque - Stator Coil Bolts: 12 N·m (1.2 kgf·m, 106 in·lb)
Sealant - Liquid Gasket, TB1211F: 92104-0004
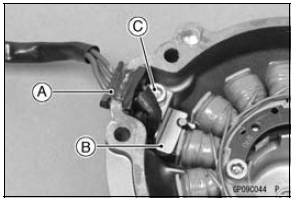
Torque - Alternator Lead Holding Plate Bolt: 9.8 N·m (1.0 kgf·m, 87 in·lb)
 Stator Coil Removal
 Alternator Rotor Removal
Service Code Reading
The service code(s) is displayed on the LCD by the number
of two digits.
NOTE
The service code of the KIBS and ABS adds “b” at the
left side of the code.
The service code of the ESD adds “E” at the left side of
the code.
When there are a number of problems, all the serv ...
Key Registration
Case 1: When the ignition key has been lost or additional
spare ignition key is required.
Prepare a new spare ignition key.
Cut the key in accordance with the shape of the current
ignition key.
Remove the rear seat (see Rear Seat Removal in the
Frame chapter).
Remove the immobilizer/K ...
Storage of Removed Parts
After all the parts including subassembly parts have been
cleaned, store the parts in a clean area. Put a clean cloth
or plastic sheet over the parts to protect from any foreign
materials that may collect before re-assembly.
Inspection
Reuse of worn or damaged parts may lead to serious acci ...