
Special Tool - Outside Circlip Pliers: 57001-144
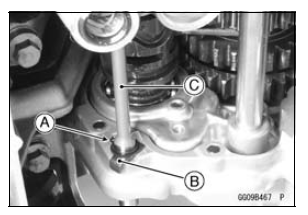
 Oil Pump Drive Gear Installation
 Oil Pump Drive Gear Shaft Installation
Oil Pan Installation
If the oil filter holder bolt [A] was removed, tighten it.
Apply a non-permanent locking agent to the threads of
the oil filter holder bolt.
Torque - Oil Filter Holder Bolt: 35 N·m (3.6 kgf·m, 26 ft·lb)
Replace the O-rings [B] with new ones, and apply grease
to them.
Install the O-ri ...
Spring Plate Free Play Adjustment
NOTE
The free play adjustment is performed by replacing the
steel plate(s).
Measure the clutch spring plate free play (see Clutch
Spring Plate Free Play Measurement), and then replace
the steel plate(s) which brings the free play within the
usable range.
Spring Plate Free Play
Usable ...
Brake Hose and Pipe Damage and Installation Condition Inspection
Inspect the brake hoses, pipes and fittings for deterioration,
cracks and signs of leakage.
The high pressure inside the brake line can cause fluid to
leak [A] or the hose to burst if the line is not properly maintained.
Bend and twist the rubber hose while examining
it.
Replace the ...