
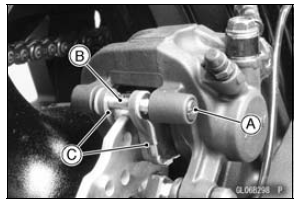
 Front Brake Pad Installation
 Rear Brake Pad Installation
Check 3-3: High Beam Indicator Light (LED) Inspection
Connect the leads in the same circuit as Check 3-2.
Connect the terminal [7] to the battery (+) terminal.
Check that the high beam indicator light (LED) [A] goes
on.
If the indicator light does not go on, replace the meter unit.
...
Amplifier Input Voltage Inspection
NOTE
Be sure the battery is fully charged.
Turn the ignition switch to OFF.
Remove the upper fairing (see Upper Fairing Removal in
the Frame chapter).
Do not disconnect the connectors.
Connect a digital meter to the amplifier connector [A] with
needle adapter set.
Special To ...
Tail/Brake Light (LED) Removal/Installation
Remove:
Upper Seat Cover (see Seat Cover Removal in the
Frame chapter)
Disconnect the tail/brake light connector [A].
Remove:
Tail/Brake Light Mounting Screws [A]
Bolts [B] and Brackets [C]
Bolt [D]
Remove the tail/brake light [A].
Bring down the rear fender rea ...