
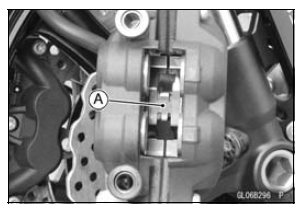
Fit the pad into the groove of the caliper as shown in the figure.

| WARNING After servicing, it takes several applications of the brake lever before the brake pads contact the disc, which could result in increased stopping distance and cause an accident resulting in injury or death. Do not attempt to ride the motorcycle until a firm brake lever is obtained by pumping the lever until the pads are against the disc. |
 Front Brake Pad Removal
 Rear Brake Pad Removal
Rocker Arm Installation
Install the both rocker arms [A] so that their marks [B] face
left side.
Replace the tie-rod nut, rear shock absorber nut and
rocker arm nut with new ones.
Apply grease to the inside of the oil seals.
Tighten:
Torque - Rocker Arm Nut: 34 N·m (3.5 kgf·m, 25 ft·lb)
Tie-Rod ...
Mud Guard Installation
Installation is the reverse of removal. Note the following.
Run the hose and lead correctly (see Cable, Wire, and
Hose Routing section in the Appendix chapter).
Check the brake line.
Apply a non-permanent locking agent to the threads of
the mud guard mounting bolts [A, B], and tighten them ...
Fuel Pump Relay Inspection
Refer to the Relay Circuit Inspection in the Electrical System
chapter.
If the fuel pump relay is normal, check the wiring to the
fuel pump relay (see Fuel Pump Relay Circuit).
Special Tool - Hand Tester: 57001-1394
If the wiring is good, check the ECU for its ground and
power supply (se ...