
NOTE
Hold the reservoir horizontal by turning the handlebar when checking brake fluid level.
If the fluid level is lower than the lower level line, fill the reservoir to the upper level line [C].
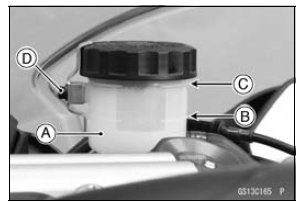
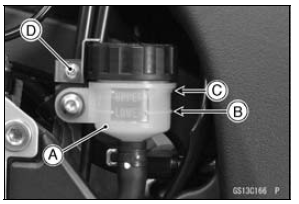
Remove the stopper [D].
If the fluid level is lower than the lower level line, fill the reservoir to the upper level line [C].
| WARNING Mixing brands and types of brake fluid can reduce the brake system’s effectiveness and cause an accident resulting in injury or death. Do not mix two brands of brake fluid. Change the brake fluid in the brake line completely if the brake fluid must be refilled but the type and brand of the brake fluid that is already in the reservoir are unidentified. |
Recommended Disc Brake Fluid
Grade: DOT4
First, tighten the brake fluid reservoir cap [B] clockwise [C] by hand until slight resistance is felt indicating that the cap is seated on the reservoir body, then tighten the cap an additional 1/6 turn [D] while holding the brake fluid reservoir body [A].
Torque - Front Brake Reservoir Stopper Screw: 1.2 N·m (0.12 kgf·m, 11 in·lb)

 Brake Hose and Pipe Damage and Installation Condition Inspection
 Brake Pad Wear Inspection
Special Tools
Bearing Driver Set:
57001-1129
Jack:
57001-1238
Bearing Remover Head, 25 × 28:
57001-1346
Bearing Remover Shaft, 13:
57001-1377
Jack Attachment:
57001-1608 ...
Exploded View
AL: Tighten the two clamp bolts alternately two times to ensure even
tightening torque.
HG: Apply high-temperature grease.
R: Replacement Parts
WL: Apply soap and water solution or rubber lubricant.
Specifications
WARNINGSome replacement tires may adversely
affect h ...
Front Wheel Removal
Remove:
Front Caliper Mounting Bolts [A] (Both Sides)
Front Caliper [B] (Both Sides)
Loosen:
Front Axle Clamp Bolts [A] (Right Side)
Front Axle [B]
Remove the lower fairings (see Lower Fairing Removal in
the Frame chapter).
Raise the front wheel off the ground.
...