
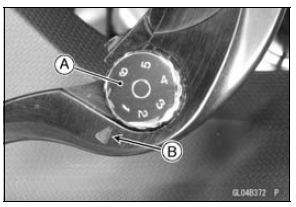
The brake lever adjuster has 6 positions so that the brake lever position can be adjusted to suit the operator’s hand.
The distance from the grip to the lever is minimum at number 6 and maximum at number 1.
 Brake Pedal Position Inspection
Front Fork Assembly
Replace the following parts with new ones.
Slide Bushing
Guide Bushing
Oil Seal
Install the following parts to the inner tube [A].
Dust Seal [B]
Retaining Ring [C]
Apply grease to the oil seal lips.
Install the oil seal [A] so that the stamp side faces lower
side.
Insta ...
Technical Information-Power Mode
The rider can choose from three engine power modes to suit their preferences
and road conditions.
The FI ECU controls the engine power by adjusting fuel injection, air intake,
and ignition timing. It
enables three-mode selection: Full Power (Mode F), Middle Power (Mode M), and
Low Power (M ...
Air Cleaner Oil Draining
A drain hose is connected to the bottom of the air cleaner
to drain water or oil accumulated in the cleaner part.
Visually check the drain hose [A] if the water or oil accumulates.
If any water or oil accumulates in the hose, remove the
plug [B] from the drain hose and drain it.
...
