
If the indicator light does not go on, replace the meter unit.
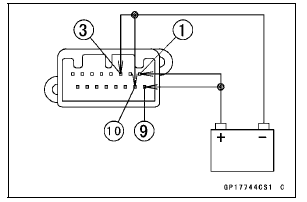
 Check 3-4: Turn Signal Indicator Light (LED) Inspection
 Check 3-6: Neutral Indicator Light (LED) Inspection
Exploded View
10. US, CA, CAL and AU Models
11. ZX1000JD/KD
G: Apply grease.
L: Apply a non-permanent locking agent.
R: Replacement Parts
S: Follow the specified tightening sequence.
1. US, CA and CAL Models
2. ZX1000J Model
3. ZX1000K Model
4. AU Model
5. Face the large diameter side re ...
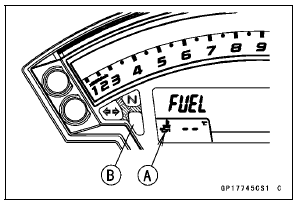
Fuel Level Warning Indicator Light
: The fuel level warning
indicators
are activated when approximately 3.8 L
(1.0 US gal) of fuel remains as follows:
For models without KIBS:
A. Fuel Level Warning Indicator Light
B. “FUEL” Indication
The fuel level warning indicator light
( ) goes
on and “FUEL” blinks in the
...
Tie-Rod and Rocker Arm Bearing Installation
Replace the needle bearings [A] and oil seals with new
ones.
Apply plenty of grease to the lips of the oil seals.
Install the needle bearings and oil seals position as shown
in the figure.
Screw the needle bearing driver into the driver holder.
Insert the needle bearing driver into th ...