
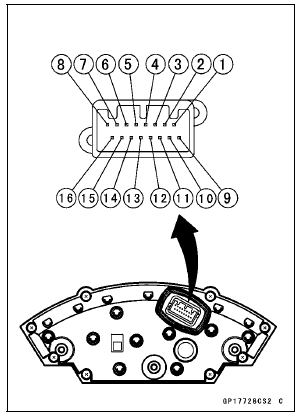
[1] Battery (+) [2] Fuel Reserve Switch [3] Ground (–) [4] Unused [5] Right Turn Signal Indicator Light (LED) (+) [6] Left Turn Signal Indicator Light (LED) (+) [7] High Beam Indicator Light (LED) (+) [8] Neutral Indicator Light (LED) (–) [9] Ignition (+) [10] Warning Indicator Light (Red LED, for Oil Pressure Warning) (–) [11] CAN Communication Line (Low) [12] CAN Communication Line (High) [13] Stop Watch (+) [14] Lap Time (+) [15] Power Mode Button (+) [16] S-KTRC Button (+)
NOTICE
Do not drop the meter unit. Place the meter unit so that it faces upward. If the meter assembly is left upside down or sideways for a long time or dropped, it will malfunction. Do not short each terminals.
 Check 2-3: Intake Air Temperature Inspection
 Check 3-1: CAN Communication Line Resistance Inspection
Connecting Rod Twist Inspection
With the big-end arbor [A] still on V block [C], hold the
connecting rod horizontally and measure the amount that
the arbor [B] varies from being paralleled with the surface
plate over a 100 mm (3.94 in.) length of the arbor to determine
the amount of connecting rod twist.
If the conne ...
Fuel Level Warning Indicator Light
: The fuel level warning
indicators
are activated when approximately 3.8 L
(1.0 US gal) of fuel remains as follows:
For models without KIBS:
A. Fuel Level Warning Indicator Light
B. “FUEL” Indication
The fuel level warning indicator light
( ) goes
on and “FUEL” blinks in the
...
Crankshaft Side Clearance Inspection
Insert a thickness gauge [A] between the thrust washer
[B] on the crankcase and the crank web [C] at the #3 main
journal to determine clearance.
If the clearance exceeds the service limit, replace the
thrust washers as a set and check the width of the crankshaft
#3 main journal.
Cra ...