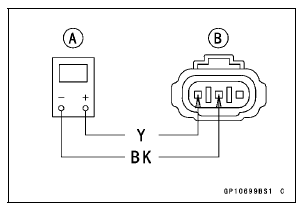

Special Tool - Hand Tester: 57001-1394
Crankshaft Sensor Resistance
Connections:
Meter (+) → Y lead
Meter (–) → BK lead
Standard: 376  564 Ω
564 Ω

If there is more resistance than the specified value, the coil has an open lead and must be replaced. Much less than this resistance means the coil is shorted, and must be replaced.
Any tester reading less than infinity (∞) indicates a short, necessitating replacement of the crankshaft sensor.
 Crankshaft Sensor Installation
 Crankshaft Sensor Peak Voltage Inspection
Stopping the engine
Close the throttle completely.
Shift the transmission into neutral
Turn the ignition key to “OFF”.
Support the motorcycle on a firm,
level surface with the side stand.
Lock the steering.
NOTE
The motorcycle is equipped with a
vehicle-down sensor, which causes
the engine to sto ...
Cleaning Vehicle before Disassembly
Clean the vehicle thoroughly before disassembly. Dirt or
other foreign materials entering into sealed areas during vehicle
disassembly can cause excessive wear and decrease
performance of the vehicle.
Arrangement and Cleaning of Removed Parts
Disassembled parts are easy to confuse. Arrange ...
Air Intake Solenoid Valve Unit Test
Remove the air intake solenoid valve (see Air Intake Solenoid
Valve Removal in the Fuel System (DFI) chapter).
Set the hand tester [A] to the × 1 Ω range and connect it
to the air intake solenoid valve terminals as shown in the
figure.
Special Tool - Hand Tester: 57001-1394
...