
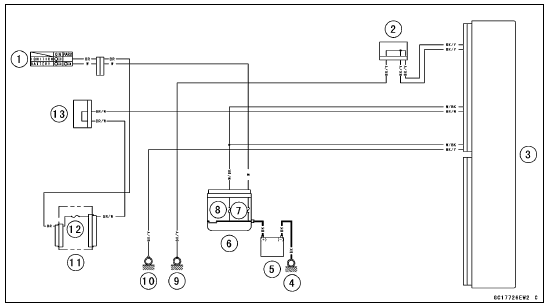
1. Ignition Switch
2. Joint Connector E
3. ECU
4. Engine Ground
5. Battery
6. Starter Relay
7. Main Fuse 30 A
8. ECU Fuse 15 A
9. Frame Ground 2
10. Frame Ground 1
11. Fuse Box 1
12. Ignition Fuse 15 A
13. Joint Connector F
 ECU Power Supply Inspection
 CAN Communication Line
Tire Repair
Currently two types of repair for tubeless tires have come
into wide use. One type is called a temporary (external) repair
which can be carried out without removing the tire from
the rim, and the other type is called permanent (internal)
repair which requires tire removal. It is generally unders ...
Steering Damper Oil Leak Inspection
Visually inspect the steering damper [A] for oil leakage.
If the oil leakage is found on it, replace the steering
damper with a new one (see Steering Damper Removal/
Installation in the Steering chapter).
ZX1000JD/KD [B]
...
DFI System
1. ECU
2. Battery
3. Vehicle-down Sensor
4. Exhaust Butterfly Valve Actuator
5. Vacuum Chamber (Other than US, CA and CAL Models)
6. Air Intake Valve Actuator (Other than US, CA and CAL Models)
7. Air Intake Valve (Other than US, CA and CAL Models)
8. Air Flow
9. Air Intake Solenoid Valve ...