
NOTE
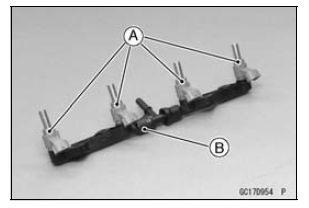
Do not damage the insertion portions of the injectors when they are pulled out from the delivery pipe assy.

NOTICE
Never drop the secondary fuel injector especially on a hard surface. Such a shock to the injector can damage it.
NOTE
Mark and record the location of the delivery pipes and the joint pipe so that the delivery pipe assy can be reassembled in the original position.
 Nozzle Assy Installation
 Nozzle Assy Assembly
Chassis Parts Lubrication
Before lubricating each part, clean off any rusty spots with
rust remover and wipe off any grease, oil, dirt, or grime.
Lubricate the points listed below with indicated lubricant.
NOTE
Whenever the vehicle has been operated under
wet or rainy conditions, or especially after using a
high ...
Brake Fluid Change
NOTE
The procedure to change the front brake fluid is as follows.
Changing the rear brake fluid is the same as for
the front brake.
Level the brake fluid reservoir.
Remove:
Screw [A]
Stopper [B]
Front Brake Reservoir Cap [C]
Diaphragm Plate
Diaphragm
Remove the rubb ...
Steering Play Inspection
Remove the lower fairings (see Lower Fairing Removal in
the Frame chapter).
Raise the front wheel off the ground with the jack.
Special Tools - Jack: 57001-1238
Jack Attachment: 57001-1608
With the front wheel pointing straight ahead, alternately
tap each end of the handlebar. The f ...