
NOTE
Be sure the battery is fully charged.
Main Harness [B] Vehicle-down Sensor [C]
Special Tool - Measuring Adapter: 57001-1700
Vehicle-down Sensor Input Voltage Connections to Adapter: Digital Meter (+) → R (sensor BL) lead Digital Meter (–) → BK (sensor BR/BK) lead
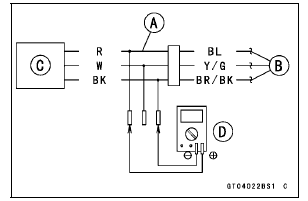
Input Voltage
Standard: DC 4.75  5.25 V
If the reading is within the standard, check the output voltage (see Vehicle-down Sensor Output Voltage Inspection).
If the reading is out of the standard, remove the ECU and check the wiring for continuity between main harness connectors.
Special Tool - Hand Tester: 57001-1394
Disconnect the ECU and sensor connectors.
Wiring Continuity Inspection ECU Connector [A] ←→ Vehicle-down Sensor Connector [B] BL lead (ECU terminal 9) [C] BR/BK lead (ECU terminal 13) [D]
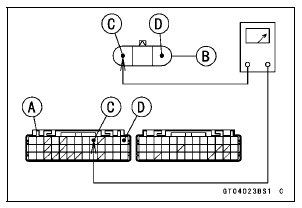
If the wiring is good, check the ECU for its ground and power supply (see ECU Power Supply Inspection in the Fuel System (DFI) chapter).
If the ground and power supply are good, replace the ECU (see ECU Removal/Installation in the Fuel System (DFI) chapter).
 Vehicle-down Sensor Installation
 Vehicle-down Sensor Output Voltage Inspection
Exploded View
25. “1T” marked side faces up.
26. “T2” marked side faces up.
27. Hollow mark faces exhaust side.
G: Apply grease.
L: Apply a non-permanent locking agent.
LG: Apply liquid gasket.
M: Apply molybdenum disulfide grease.
MO: Apply molybdenum disulfide oil solution.
...
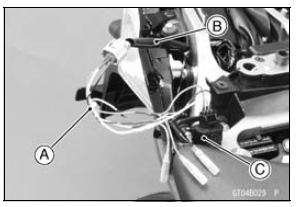
Electrical Wiring
Wiring Inspection
Visually inspect the wiring for signs of burning, fraying,
etc.
If any wiring is poor, replace the damaged wiring.
Pull each connector [A] apart and inspect it for corrosion,
dirt, and damage.
If the connector is corroded or dirty, clean it carefully. If it
is da ...
Steering Play Adjustment
Remove:
Steering Stem Head with Handlebars (see Handlebar
Removal in the Steering chapter).
Bend the claws [A] of the claw washer [B] straighten.
Remove:
Steering Stem Locknut [C]
Claw Washer
Adjust the steering using the steering stem nut wrench
[A].
Special Tool - Ste ...