
Sealant - Liquid Gasket, TB1211F: 92104-0004
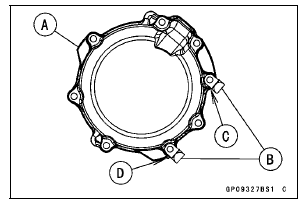
Fit the upper clamp to the side [C] of the alternator cover.
Fit the lower clamp to the stopper [D] of the alternator cover.
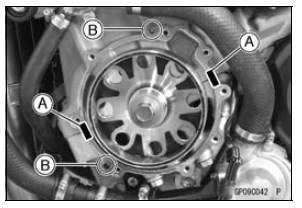
 Alternator Cover Removal
 Stator Coil Removal
Blank Key Detection (Service Code 36, Equipped Models)
Ignition Key Inspection
Register the ignition key correctly (see Key Registration
in the Electrical System chapter).
If the service code 36 appears again, the transponder in
the key is malfunction, replace it.
Immobilizer System Circuit
1. ECU
2. Ignition Switch
3. Immobilizer Ampl ...
Cable Removal
Remove:
Air Cleaner Housing (see Air Cleaner Housing Removal
in the Fuel System (DFI) chapter)
Right Lower Fairing (see Lower Fairing Removal in the
Frame chapter)
Loosen the nuts [A], and slide the lower end of the clutch
cable to give the cable plenty of play.
Screw in the ...
Intake Air Temperature Sensor Output Voltage Inspection
NOTE
Be sure the battery is fully charged.
Turn the ignition switch to OFF.
Remove the fuel tank (see Fuel Tank Removal in the Fuel
System (DFI) chapter).
Disconnect the intake air temperature sensor connector
and connect the measuring adapter [A] between these
connectors as shown in ...