
NOTICE
Never remove the sealing strip, or the battery can be damaged.
Do not install a conventional
battery in this motorcycle, or the
electrical system cannot work
properly.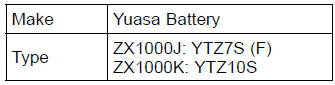
NOTE
If you charge the sealed battery, never fail to observe the instructions shown in the label on the battery.
| WARNING Battery posts, terminals and related accessories contain lead and lead compounds, chemicals known to the State of California to cause cancer and reproductive harm. Wash hands after handling. |
 Battery Maintenance
 Battery Removal
Starting the Engine
Check that the engine stop switch is
in the
position.
A. Engine Stop Switch
B. Starter Button
Turn the ignition key to ÔÇťONÔÇŁ.
Make sure the transmission is in neutral.
A. Neutral Indicator Light
B. Ignition Switch
C. ÔÇťONÔÇŁ position
NOTE
The motorcycle is equipped w ...
Coolant Temperature Meter
The coolant temperature gauge indicates
temperature of the engine
coolant. The ÔÇť ÔÇŁ symbol is displayed
if the coolant temperature meter
is selected.
A. Coolant Temperature Meter
B. Warning Indicator Light (Red)
C. ÔÇť ÔÇŁ Symbol
If the coolant temperature is below
40┬░C (104┬░F ...
Rear Sprocket Warp Inspection
Raise the rear wheel off the ground with the stand so that
it will turn freely.
Set a dial gauge [A] against the rear sprocket [B] near the
teeth as shown in the figure, and rotate [C] the rear wheel
to measure the sprocket runout (warp). The difference
between the highest and lowest di ...