
NOTICE
Be sure to disconnect the negative (–) cable first.
ZX1000J Model [E] ZX1000K Model [F]

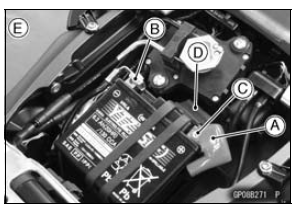
 Battery
 Battery Installation
Check 3-7 Stop Watch Inspection
Connect the leads in the same circuit as Check 3-2.
By pushing the upper button each time to set the stop
watch mode.
Connect the insulated auxiliary lead processed insulation
to the terminal [13] as shown in the figure, then stop watch
start to count.
While count the stop watch, conn ...
Rear Turn Signal Light Bulb Replacement
Remove the upper seat cover (see Seat Cover Removal
in the Frame chapter).
Disconnect the tail/brake light connector [A].
Turn the socket [A] counterclockwise and remove the
socket together with the bulb.
Push and turn the turn signal light bulb [A] counterclockwise
an ...
Thermostat Removal
Remove:
Fuel Tank (see Fuel Tank Removal in the Fuel System
(DFI) chapter)
Air Cleaner Housing (see Air Cleaner Housing Removal
in the Fuel System (DFI) chapter)
Throttle Body Assy (see Throttle Body Assy Removal in
the Fuel System (DFI) chapter)
Throttle Body Assy Holder Clamp [A]
...