
If any signs of cracking or electrolyte leakage from the sides of the battery.
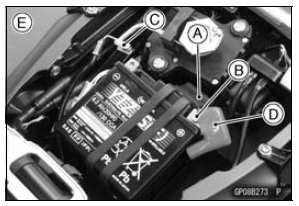
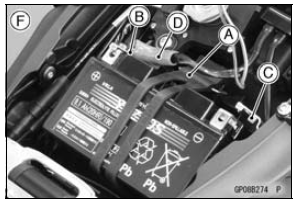
ZX1000J Model [E] ZX1000K Model [F]
NOTICE
If each battery cable is not correctly disconnected or connected, sparks can arise at electrical connections, causing damage to electrical and DFI parts.
 Battery Removal
 Precautions
Water Pump Inspection
Remove the left lower fairing (see Lower Fairing Removal
in the Frame chapter).
Check the drainage outlet passage [A] at the bottom of
the water pump body for coolant leaks.
If the mechanical seal is damaged, the coolant leaks
through the seal and drains through the passage. Replace
th ...
ESD (Electronic Steering Damper) ECU Communication Error (Service Code 3C,
ZX1000JD/KD)
ESD ECU Communication Line Inspection
When the data (for status of ESD system) is not sent from
the ESD ECU to the meter unit and ECU, the service code
3C is displayed.
The data is sent through the CAN communication line.
The service code 3C is detected with the meter unit.
The FI symbol does ...
Piston Wear Inspection
Measure the outside diameter [A] of each piston 5 mm
(0.20 in.) [B] up from the bottom of the piston at a right
angle to the direction of the piston pin.
If the measurement is under service limit, replace the piston.
Piston Diameter
Standard: 75.959 75.974 mm
(2.9905 2.9911 in.)
...