
NOTE
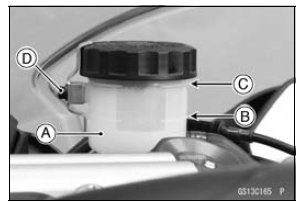
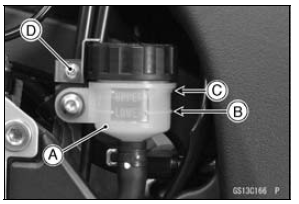
Hold the reservoir horizontal by turning the handlebar when checking brake fluid level.
If the fluid level is lower than the lower level line, fill the reservoir to the upper level line [C].
Remove the stopper [D].
If the fluid level is lower than the lower level line, fill the reservoir to the upper level line [C].
| WARNING Mixing brands and types of brake fluid can reduce the brake system’s effectiveness and cause an accident resulting in injury or death. Do not mix two brands of brake fluid. Change the brake fluid in the brake line completely if the brake fluid must be refilled but the type and brand of the brake fluid that is already in the reservoir are unidentified. |
Recommended Disc Brake Fluid
Grade: DOT4
First, tighten the brake fluid reservoir cap [B] clockwise [C] by hand until slight resistance is felt indicating that the cap is seated on the reservoir body, then tighten the cap an additional 1/6 turn [D] while holding the brake fluid reservoir body [A].
Torque - Front Brake Reservoir Stopper Screw: 1.2 N·m (0.12 kgf·m, 11 in·lb)

 Brake Hose and Pipe Damage and Installation Condition Inspection
 Brake Pad Wear Inspection
Air Intake Duct Assembly (US, CA and CAL Models)
Install the dampers [A] and seal [B] as shown in the figure.
Fit the holder [C] to the air intake ducts [D].
Projections [E] and Holes [F]
Grooves [G] and Ribs [H]
Tighten:
Torque - Air Intake Duct Assembly Screws [I]: 1.5 N·m (0.15
kgf·m, 13 in·lb)
Turn the plug [J] so that ...
What is a Limited Warranty?
The most important thing to know about your warranty is that it protects you
from manufacturing defects in material or workmanship during the warranty
period.
You can find the warranty period in the Kawasaki Limited Warranty Certificate
your Kawasaki dealer provided to you at the time of sale ...
Spark Plugs
The standard spark plug is shown in
the table. The spark plugs should be
replaced in accordance with the Periodic
Maintenance Chart.
Spark plug removal should be done
only by a competent mechanic following
the instructions in the Service Manual.
Spark Plug
A. Plug Gap ...