
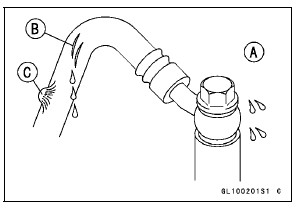
The high pressure inside the brake line can cause fluid to leak [A] or the hose to burst if the line is not properly maintained.
Bend and twist the rubber hose while examining it.
Torque - Brake Hose Banjo Bolts: 25 N·m (2.5 kgf·m, 18 ft·lb)
If any brake hose routing is incorrect, run the brake hose according to Cable, Wire, and Hose Routing section in the Appendix chapter.
 Brake Fluid Leak (Brake Hose and Pipe) Inspection
 Brake Fluid Level Inspection
ZX1000JC /KC
Models
1. Run the fuse box 2 lead in front of the rib for the fuse box 2.
2. Seat Lock Cable
3. Hook the licence plate light lead and the left turn signal light lead on
the projection of the tool
kit case.
4. Rib for Fuse Box 2
5. Run the starter relay lead in back of the rib for the fuse box 2 ...
Crankcase Splitting
Remove the engine (see Engine Removal in the Engine
Removal/Installation chapter).
Set the engine on a clean surface and hold the engine
steady while parts are being removed.
Remove:
Cylinder Head (see Cylinder Head Removal in the Engine
Top End chapter)
Starter Motor (see Starter M ...
Tightening Sequence
Generally, when installing a part with several bolts, nuts,
or screws, start them all in their holes and tighten them to
a snug fit. Then tighten them according to the specified sequence
to prevent case warpage or deformation which can
lead to malfunction. Conversely when loosening the bolts,
n ...