
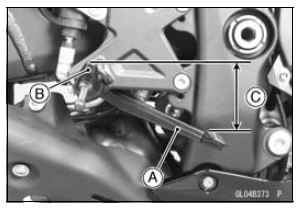
Footpeg [B]
Pedal Position Standard: About 65 mm (2.6 in.) [C] below top of footpeg
If it is incorrect, adjust the position.
 Brake Lever Position Adjustment
 Brake Pedal Position Adjustment
Multifunction Meter
A. Multifunction Display
Odometer
Trip Meters
Current Mileage
Average Mileage
Fuel consumption
Stop Watch
B. Speedometer
C. Gear Position Indicator
D. Power Mode Indicator
E. S-KTRC Mode Indicator
F. Warning Symbols
G. Lap Counter/Coolant /
Intake Air Temperature
Meter
...
Caliper Rubber Parts Replacement
Front Caliper Disassembly
Remove:
Front Caliper (see Front Caliper Removal in the Brakes
chapter)
Brake Pads (see Front Brake Pad Removal in the Brakes
chapter)
Remove:
Front Caliper Assembly Bolts [A]
Split the front caliper.
Remove:
Pad Spring
O-ring [A]
U ...
Subthrottle Valve Actuator Resistance Inspection
Turn the ignition switch to OFF.
Disconnect the subthrottle valve actuator connector [A].
Connect a digital meter to the subthrottle valve actuator
connector [A].
Measure the subthrottle valve actuator resistance.
Subthrottle Valve Actuator Resistance
Connections: Y/BK lead [1 ...