
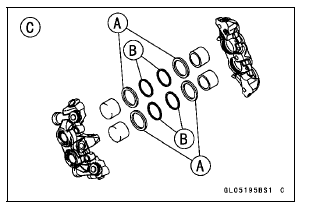
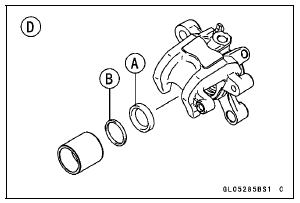
The fluid seal (piston seal) [A] is placed around the piston to maintain clearance between the pad and the disc. If the seal is in a poor condition, it could lead the pad to wear excessively or the brake to drag, which may cause the temperature of the discs or the brake fluid to increase.
Brake fluid leakage around the pad.
Brakes overheat.
Considerable difference in inner and outer pad wear.
Seal and piston are stuck together.
If the fluid seal is replaced, replace the dust seal [B] as well. Also, replace all seals every other time the pads are changed.
Front Caliper [C] Rear Caliper [D]
 Caliper Installation
 Rear Caliper Dust Boot and Friction Boot Damage
Stick Coil Installation
Apply a thin coat of grease [A] to the stick coils for easy
installation.
Insert the stick coils so that the coil heads align with the
lines [B] on the cylinder head cover.
NOTICE
Do not tap the coil head while installing the coil.
After installation, be sure the stick coils are ...
Overview
Kawasaki Intelligent anti-lock Brake System (KIBS) offers enhanced braking
stability (ABS performance
equivalent to the current model) to supersportmodels, which pitch more than most
motorcycles
and also offers high-precision front and rear brake pressure control
(high-precision ABS) for spo ...
Air Cleaner Housing Installation
For ZX1000JD/KD, be sure to install the pad [A].
Install the clamp bolt heads [A] inside as shown in the
figure.
Install the air cleaner housing on the throttle body assy.
Push in the ducts [B] touch the stoppers [C] of the throttle
body.
Be sure the hoses are routed correctly ...