
NOTE
Whenever the vehicle has been operated under wet or rainy conditions, or especially after using a high-pressure water spray, perform the general lubrication.
Pivots: Lubricate with Grease.
Brake Lever
Brake Pedal
Clutch Lever
Rear Master Cylinder Push Rod Joint Pin
Sidestand
Points: Lubricate with Grease
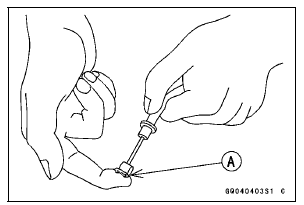
Clutch Inner Cable Upper and Lower Ends [A] Throttle Inner Cable Upper and Lower Ends
Cables: Lubricate with Rust Inhibitor.
Clutch Cable
Throttle Cables
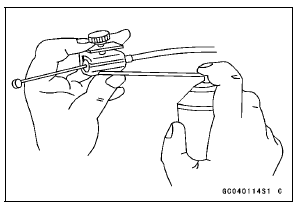
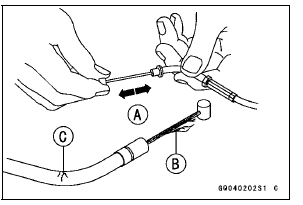
The cable may be lubricated by using a commercially available pressure cable lubricator with an aerosol cable lubricant.
If cable movement is not free after lubricating, if the cable is frayed [B], or if the cable housing is kinked [C], replace the cable.
 Others
 Bolts, Nuts and Fasteners Tightness Inspection
Special Tools
Bearing Driver Set:
57001-1129
Jack:
57001-1238
Bearing Remover Head, 25 × 28:
57001-1346
Bearing Remover Shaft, 13:
57001-1377
Jack Attachment:
57001-1608 ...
Wheel Rotation Sensor Air Gap Inspection
Raise the front/rear wheel off the ground (see Front/Rear
Wheel Removal in the Wheels/Tires chapter).
Measure the air gap between the sensor and sensor rotor
at several points by turning the wheel slowly.
Thickness Gauge [A]
Wheel Rotation Sensor Air Gap
Standard:
Front 0.4 1.6 mm ...
Wheel Bearing Damage Inspection
Raise the front wheel off the ground with the jack (see
Front Wheel Removal in the Wheels/Tires chapter).
Special Tools - Jack: 57001-1238
Jack Attachment: 57001-1608
Turn the handlebar all the way to the right or left.
Inspect the roughness of the front wheel bearing by moving
[A] ...