
Due to friction plate wear and clutch cable stretch over a long period of use, the clutch operation should be checked each day before riding the motorcycle, and must be adjusted in accordance with the Periodic Maintenance Chart.
Inspection
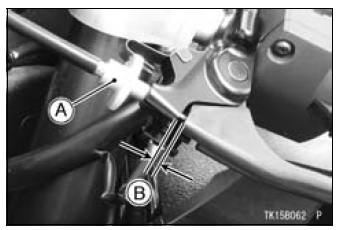
A. Adjuster
B. Clutch Lever Play
Clutch Lever Play

If the play is incorrect, adjust the lever play as follows.
Adjustment
| WARNING Excess clutch cable play could prevent clutch disengagement and cause a crash resulting in serious injury or death. When adjusting the clutch cable, be sure the upper end of the outer cable is fully seated in its fitting so that it doesn’t slip into place later and create excessive cable play. |
| WARNING The engine and exhaust system get extremely hot during normal operation and can cause serious burns. Never touch a hot engine or an exhaust pipe during clutch adjustment. |
NOTE
DANGER
Exhaust gas contains carbon monoxide, a colorless, odorless poisonous gas. Inhaling carbon monoxide can cause serious brain injury or death.
DO NOT run the engine in enclosed areas. Operate only in a well-ventilated area.
 Idle Speed
 Drive Chain
Check 2-2: Fuel Level Warning Inspection
Remove:
Fuel Tank (see Fuel Tank Removal in the Fuel System
(DFI) chapter)
Connect the resistor(s) [A] (about 50 to 100 Ω) between
the fuel pump connector terminal [B] of the main harness
side and the battery negative (–) terminal [C] as shown.
Turn the ignition switch ...
Instrument display brightness control
The brightness of the tachometer
LED segments and illumination of the
multifunction meter are controlled automatically
depending on the ambient
brightness.
A. Tachometer
B. Ambient Brightness Sensor
C. Multifunction Meter
NOTE
Be careful not to cover the ambient
brightness sensor on th ...
Turn Signal Relay Inspection
Remove the battery (see Battery Removal).
Take the turn signal relay [A] off the rear fender.
Disconnect the connector [B].
Connect one 12 V battery and turn signal lights as indicated
in the figure, and count how many times the lights
blink for one minute.
Turn Signal Relay ...