
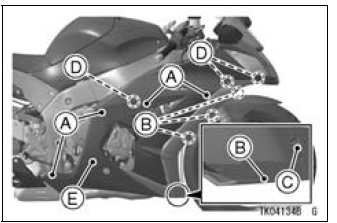
A. Bolts
B. Quick Rivet
C. Large Quick Rivet
D. Tabs
E. Right Fairing and Cover
NOTE
Quick Rivet Removal
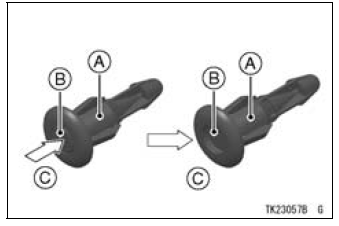
A. Quick Rivet
B. Center Pin
C. Push in.
Quick Rivet Installation
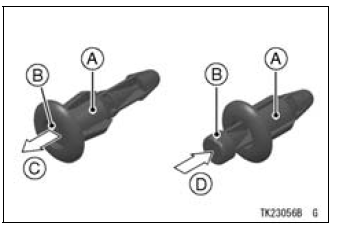
A. Quick Rivet
B. Center Pin
C. Pull up fully.
D. Push in.
A. Reserve Tank Cap
NOTE
NOTICE
If coolant must be added often, or the reserve tank completely runs dry, there is probably leakage in the system. Have the cooling system inspected by your authorized Kawasaki dealer.
Coolant Change
Have the coolant changed by an authorized Kawasaki dealer.
 Coolant Level Inspection
 Spark Plugs
Intake Air Pressure Sensor #2 Installation
NOTE
The intake air pressure sensor #2 is the same part as
the intake air pressure sensor #1.
Installation is basically the reverse of removal.
Position the intake air pressure sensor #2 [A] between the
projections [B] on the rubber damper.
Install the rubber damper [A] on the brac ...
Hub Bearing Removal
Remove the wheels (see Front/Rear Wheel Removal),
and take out the following.
Collars
Coupling (Out of rear hub)
Grease Seals
Use the bearing remover to remove the hub bearings [A].
NOTICE
Do not lay the wheel on the ground with the disc
facing down. This can damage or warp the d ...
Wiring Diagram (US, CA and CAL without KIBS Models)
ZX1000JC
ZX1000JD
...