
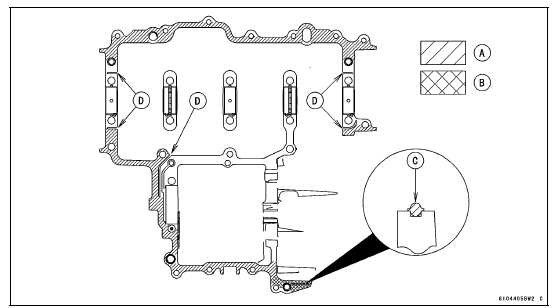
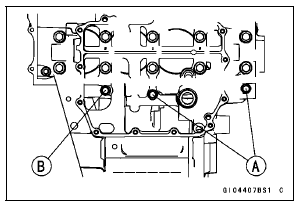
Sealant - Liquid Gasket, TB1216B [A]: 92104-1064 Liquid Gasket, TB1207B [B]: 92104-2068
NOTE
NOTICE
Do not apply liquid gasket around the crankshaft main bearing inserts and oil passage.
NOTE
Install the drive shaft bearing [A].
Special Tool - Bearing Driver Set: 57001-1129
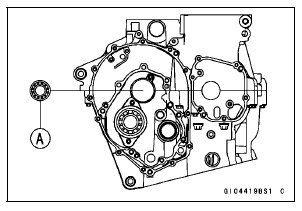
Face the oil seal side of the bearing to the bottom.
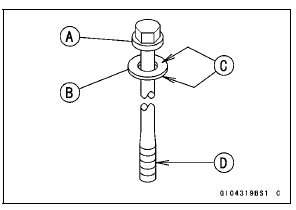
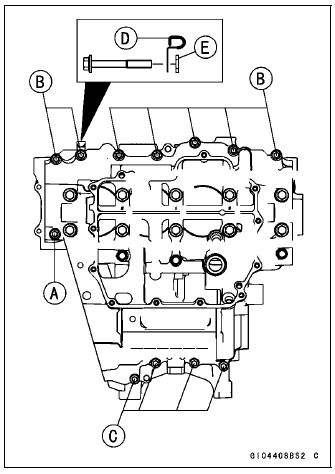
Install the M9 bolts and washers.
L = 113 mm (4.45 in.) [A] L = 100 mm (3.94 in.) [B]
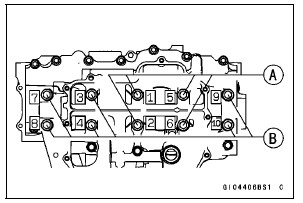
Tighten M9 bolts by following the sequence numbers [1

10].
Torque - Lower Crankcase Bolts (M9): 45 N·m (4.6 kgf·m, 33 ft·lb)
Install the M7 bolts.
L = 50 mm (2.0 in.) [A] L = 45 mm (1.8 in.) [B] Tighten:
Torque - Lower Crankcase Bolts (M7): 20 N·m (2.0 kgf·m, 15 ft·lb)
Replace the M6 bolt washers with new ones.
Install the M6 bolts.
L = 60 mm (2.4 in.) [A] (With Washer) L = 45 mm (1.8 in.) [B] L = 40 mm (1.6 in.) [C]
Install the clamp [D] and washer [E] as shown in the figure.
Tighten:
Torque - Lower Crankcase Bolts (M6): 12 N·m (1.2 kgf·m, 106 in·lb)
Replace the M8 bolt washers with new ones.
Install the M8 bolts [A] and washers.
Install the M7 bolt [B].
Tighten:
Torque - Upper Crankcase Bolts (M8): 27 N·m (2.8 kgf·m, 20 ft·lb) Upper Crankcase Bolt (M7): 20 N·m (2.0 kgf·m, 15 ft·lb)
Wipe up the liquid gasket that seeps out around the crankcase mating surface.
Crankshaft turns freely.
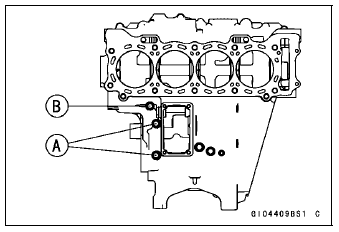
Drive Shaft Bearing Holder [A] Output Shaft Bearing Holder [B]

Turn the flat side [C] of the holders to inside.
 Lower Crankcase Assembly
For Primary Fuel Injectors
Remove the air cleaner housing (see Air Cleaner Housing
Removal).
Disconnect the injector connector and connect the harness
adapter [A] between these connectors as shown in
the figure.
Main Harness [B]
Primary Fuel Injector #1 [C]
Special Tool - Measuring Adapter: 57001-1700
...
Tire Tread Wear Inspection
As the tire tread wears down, the tire becomes more susceptible
to puncture and failure. An accepted estimate is
that 90% of all tire failures occur during the last 10% of tread
life (90% worn). So it is false economy and unsafe to use
the tires until they are bald.
Measure the tread depth a ...
Engine Stop Switch Operation Inspection
First Step
Set the gear position in the neutral position.
Turn the ignition switch to ON.
Turn the engine stop switch to stop position [A].
Push the starter button.
The engine does not start.
If the engine starts, inspect the engine stop switch (see
Switch Inspection in the Electri ...
