
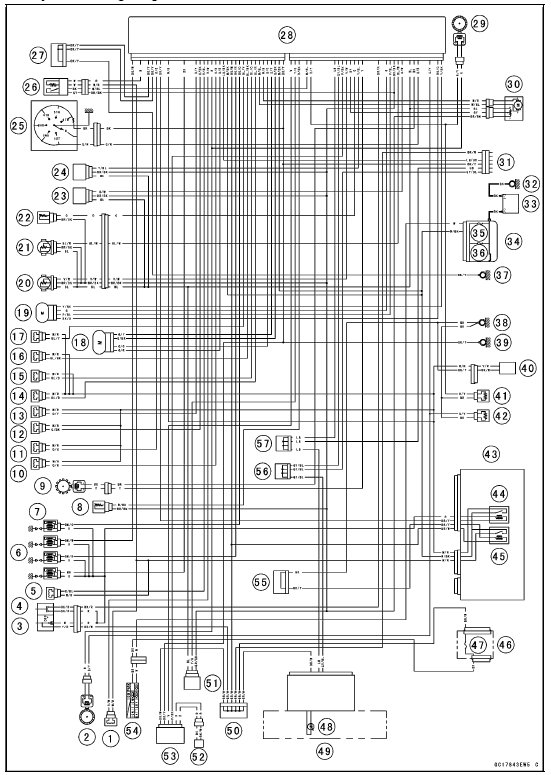
Part Names
1. Air Intake Solenoid Valve (Other than US, CA and CAL Models)
2. Front Wheel Rotation Sensor
3. Engine Stop Switch
4. Starter Button
5. Air Switching Valve
6. Stick Coil #1, #2, #3, #4
7. Spark Plugs
8. Intake Air Temperature Sensor
9. Crankshaft Sensor
10. Secondary Fuel Injector #1
11. Secondary Fuel Injector #2
12. Secondary Fuel Injector #3
13. Secondary Fuel Injector #4
14. Primary Fuel Injector #1
15. Primary Fuel Injector #2
16. Primary Fuel Injector #3
17. Primary Fuel Injector #4
18. Idle Speed Control Valve Actuator
19. Subthrottle Valve Actuator
20. Main Throttle Sensor
21. Subthrottle Sensor
22. Water Temperature Sensor
23. Intake Air Pressure Sensor #2
24. Intake Air Pressure Sensor #1
25. Gear Position Switch
26. Oxygen Sensor (Equipped Models)
27. Joint Connector E
28. ECU
29. Rear Wheel Rotation Sensor
30. Exhaust Butterfly Valve Actuator
31. Immobilizer (Equipped Models)/Kawasaki Diagnostic System Connector
32. Engine Ground
33. Battery
34. Starter Relay
35. Main Fuse 30 A
36. ECU Fuse 15 A
37. Frame Ground 2
38. Frame Ground 3
39. Frame Ground 1
40. Fuel Pump
41. Resister R
42. Resister F
43. Relay Box
44. Fuel Pump Relay
45. ECU Main Relay
46. Fuse Box 1
47. Ignition Fuse 15 A
48. Oil Pressure/Water Temperature/FI/Immobilizer Warning Indicator Light
49. Meter Unit
50. Joint Connector F
51. Vehicle-down Sensor
52. Immobilizer Antenna (Equipped Models)
53. Immobilizer Amplifier (Equipped Models)
54. Ignition Switch
55. Joint Connector A
56. Joint Connector C
57. Joint Connector D
 DFI System
 DFI System Wiring Diagram (KIBS Equipped Models)
Check 3-3: High Beam Indicator Light (LED) Inspection
Connect the leads in the same circuit as Check 3-2.
Connect the terminal [7] to the battery (+) terminal.
Check that the high beam indicator light (LED) [A] goes
on.
If the indicator light does not go on, replace the meter unit.
...
Swingarm Bearing Installation
Replace the needle bearings, ball bearing, grease seals
and circlip with new ones.
Install the needle bearings, ball bearing, grease seals and
circlip as shown in the figure.
Insert the needle bearing driver [A] into the needle bearing
[B] and press the needle bearing into the housing u ...
Daily Checks
Check the following items each day before you ride. The time required is
minimal,
and habitual performance of these checks will help ensure you a safe, reliable
ride.
If any irregularities are found during these checks, refer to the Maintenance
and
Adjustment chapter or see your dealer fo ...