
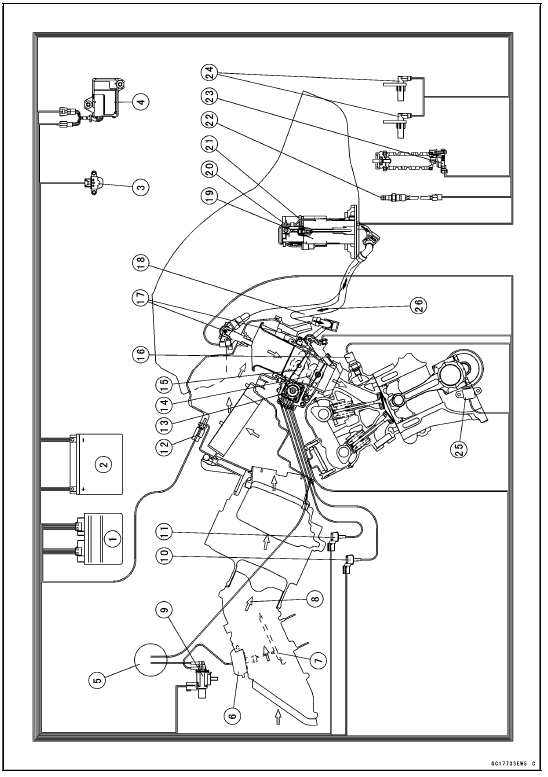
1. ECU
2. Battery
3. Vehicle-down Sensor
4. Exhaust Butterfly Valve Actuator
5. Vacuum Chamber (Other than US, CA and CAL Models)
6. Air Intake Valve Actuator (Other than US, CA and CAL Models)
7. Air Intake Valve (Other than US, CA and CAL Models)
8. Air Flow
9. Air Intake Solenoid Valve (Other than US, CA and CAL Models)
10. Intake Air Pressure Sensor #2
11. Intake Air Pressure Sensor #1
12. Intake Air Temperature Sensor
13. Subthrottle Valve Actuator
14. Main Throttle Sensor
15. Subthrottle Sensor
16. Water Temperature Sensor
17. Fuel Injectors
18. Primary Fuel Hose
19. Fuel Pump
20. Fuel Filter
21. Pressure Regulator
22. Oxygen Sensor (Equipped Models)
23. Gear Position Switch
24. Wheel Rotation Sensors
25. Crankshaft Sensor
26. Fuel Flow
 Exploded View
 DFI System Wiring Diagram
Water Temperature Sensor Output Voltage Inspection
NOTE
Be sure the battery is fully charged.
Turn the ignition switch to OFF.
Remove the throttle body assy (see Throttle Body Assy
Removal in the Fuel System (DFI) chapter).
Disconnect the water temperature sensor connector and
connect the measuring adapter [A] between these connectors
...
Air Intake Duct Assembly (US, CA and CAL Models)
Install the dampers [A] and seal [B] as shown in the figure.
Fit the holder [C] to the air intake ducts [D].
Projections [E] and Holes [F]
Grooves [G] and Ribs [H]
Tighten:
Torque - Air Intake Duct Assembly Screws [I]: 1.5 N·m (0.15
kgf·m, 13 in·lb)
Turn the plug [J] so that ...
IC Igniter Inspection
The IC igniter is built in the ECU [A].
Refer to the following items.
Interlock Operation Inspection (see Interlock Operation
Inspection)
Ignition System Troubleshooting (see Ignition System
section)
ECU Power Supply Inspection (see ECU Power Supply
Inspection in the Fuel System (D ...