Kawasaki Ninja Service Manual: Engine Removal
- Support the rear part of the swingarm with a stand.
- Squeeze the brake lever slowly and hold it with a band
[A].
| WARNING Motorcycle may fall over unexpectedly
resulting in
an accident or injury. Be sure to hold the front brake
when removing the engine. |
NOTICE
Be sure to hold the front brake when removing the
engine, or the motorcycle may fall over. The engine
or the motorcycle could be damaged.
- Drain:
Engine Oil (see Engine Oil Change in the Periodic Maintenance
chapter)
Coolant (see Coolant Change in the Periodic Maintenance
chapter)
- Remove:
Upper Fairing Assembly (see Upper Fairing Assembly
Removal in the Frame chapter)
Fuel Tank (see Fuel Tank Removal in the Fuel System
(DFI) chapter)
Air Cleaner Housing (see Air Cleaner Housing Removal
in the Fuel System (DFI) chapter)
Throttle Body Assy (see Throttle Body Assy Removal in
the Fuel System (DFI) chapter)
Clutch Cable Lower End (see Cable Removal in the
Clutch chapter)
Radiator (see Radiator and Radiator Fan Removal in the
Cooling System chapter)
Exhaust Pipe (see Exhaust Pipe Removal in the Engine
Top End chapter)
Premuffler Chamber (see Premuffler Chamber Removal
in the Engine Top End chapter)
Shift Lever (see Shift Pedal Removal in the Crankshaft/
Transmission chapter)
Engine Sprocket (see Engine Sprocket Removal in the
Final Drive chapter)
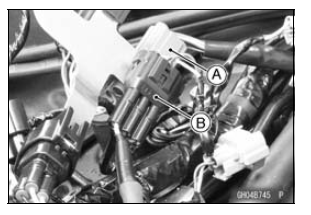
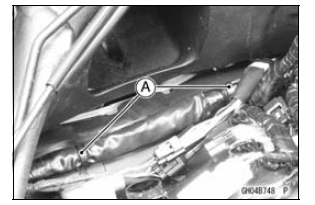
- Disconnect:
Gear Position Switch/Sidestand Switch Lead Connector
[A]
Crankshaft Sensor/Oil Pressure Switch Lead Connector
[B]
Stick Coil Connectors (see Stick Coil Removal in the
Electrical System chapter)
- Remove the air switching valve (see Air Switching Valve
Removal in the Engine Top End chapter).
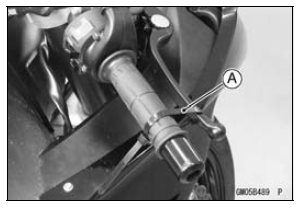
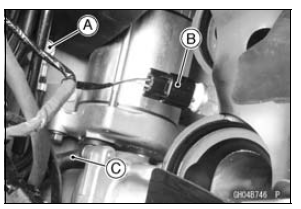
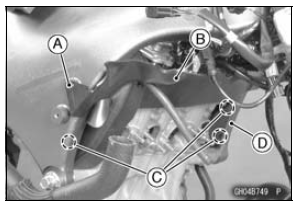
- Remove the engine ground cable terminal bolt [A].
- Disconnect:
Water Temperature Sensor Connector [B]
Starter Motor Cable [C] (see Starter Motor Removal in
the Electrical System chapter)
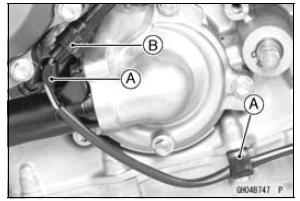
- Free the lead from the clamps [A].
- Disconnect the sidestand switch lead connector [B].
- Remove:
Bolt [A]
Heat Insulation Plate [B]
Clear the projections [C] from the frame [D].
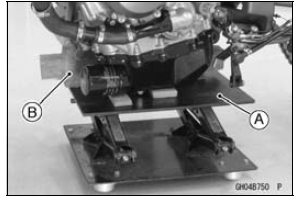
- Support the engine with a suitable stand [A].
Put a plank [B] onto the suitable stand for engine balance.
- Remove:
Left Front Engine Mounting Bolt [A]
Middle Engine Mounting Nut [B]
Lower Engine Mounting Nut [C]
- Remove:
Right Front Engine Mounting Bolt [A]
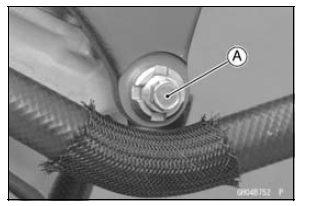
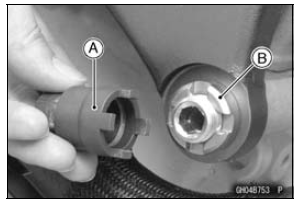
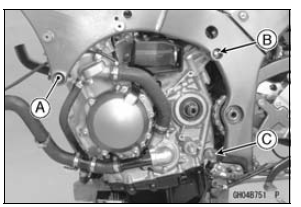
- Using the Hexagon Wrench, turn the adjusting collar [A]
counterclockwise to make the gap between the engine
and adjusting collar.
- Turn the middle and lower engine mounting bolts clockwise
to make the gap between the adjusting collar and
frame.
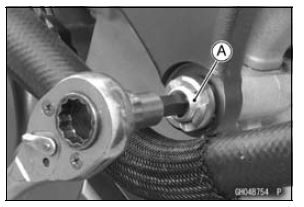
- Pull out the engine mounting bolts.
- Using the stand, take out the engine.
Apply molybdenum disulfide grease to the threads of the
adjusting collars [A].
Install the adjusting collars to crankcase backside until
end of the threads.
Install the adjusting co ...
Other materials:
Premuffler Chamber Removal
Remove:
Muffler Body (see Muffler Body Removal)
Right Lower Fairing (see Lower Fairing Removal in the
Frame chapter)
Front Seat (see Front Seat Removal in the Frame chapter)
Oxygen Sensor (Equipped Models) (see Oxygen Sensor
Removal (Equipped Models) in the Electrical System
chapter ...
ESD (Electronic Steering Damper) ECU Communication Error (Service Code 3C,
ZX1000JD/KD)
ESD ECU Communication Line Inspection
When the data (for status of ESD system) is not sent from
the ESD ECU to the meter unit and ECU, the service code
3C is displayed.
The data is sent through the CAN communication line.
The service code 3C is detected with the meter unit.
The FI symbol does ...
Serial number locations
The engine and frame serial numbers are used to register the motorcycle.
They
are the only means of identifying your particular machine from others of the
same
model type. These serial numbers may be needed by your dealer when ordering
parts. In the event of theft, the investigating authoriti ...

 Engine Installation