
NOTE
Install the bearings so that the marked side faces out.
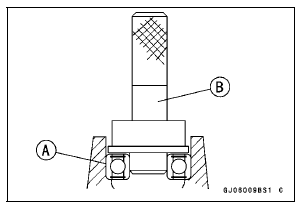
Special Tool - Bearing Driver Set [B]: 57001-1129
Apply high-temperature grease to the grease seal lips.
Special Tool - Bearing Driver Set [C]: 57001-1129

 Hub Bearing Removal
 Hub Bearing Inspection
Oil Pan Installation
If the oil filter holder bolt [A] was removed, tighten it.
Apply a non-permanent locking agent to the threads of
the oil filter holder bolt.
Torque - Oil Filter Holder Bolt: 35 N·m (3.6 kgf·m, 26 ft·lb)
Replace the O-rings [B] with new ones, and apply grease
to them.
Install the O-ri ...
Front, Rear Wheel Rotation Difference Abnormal Inspection (Service Code b
25)
Check the following and correct the faulty part.
Incorrect Tire Pressure
Tires not recommended for the motorcycle were installed
(incorrect tire size).
Deformation of Wheel or Tire
Missing Teeth or Clogging with Foreign Matter of Sensor
Rotor (see Wheel Rotation Sensor Rotor Inspe ...
Serial number locations
The engine and frame serial numbers are used to register the motorcycle.
They
are the only means of identifying your particular machine from others of the
same
model type. These serial numbers may be needed by your dealer when ordering
parts. In the event of theft, the investigating authoriti ...