
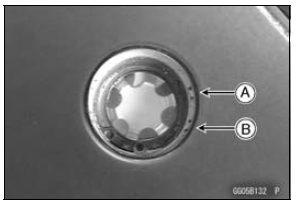
Check that the engine oil level is between the upper [A] and lower [B] levels in the gauge.
NOTE
NOTICE
Racing the engine before the oil reaches every part can cause engine seizure.
If the engine oil gets extremely low or if the oil pump or oil passages clog up or otherwise do not function properly, the warning indicator light (LED) and oil pressure warning symbol will light. If this light stays on when the engine is running above idle speed, stop the engine immediately and find the cause.
If the oil level is too high, remove the excess oil, using a syringe or some other suitable device.
If the oil level is too low, add the correct amount of oil through the oil filler opening. Use the same type and make of oil that is already in the engine.
NOTE
If the engine oil type and make are unknown, use any brand of the specified oil to top off the level in preference to running the engine with the oil level low. Then at your earliest convenience, change the oil completely.
 Engine Oil and Oil Filter
 Engine Oil Change
Fuel Tank Cleaning
WARNINGGasoline and low flash-point solvents can
be
flammable and/or explosive and cause severe
burns. Clean the tank in a well-ventilated area, and
take care that there are no sparks or flame anywhere
near the working area. Do not use gasoline
or low flash-point solvents t ...
Front Fork Assembly
Replace the following parts with new ones.
Slide Bushing
Guide Bushing
Oil Seal
Install the following parts to the inner tube [A].
Dust Seal [B]
Retaining Ring [C]
Apply grease to the oil seal lips.
Install the oil seal [A] so that the stamp side faces lower
side.
Insta ...
Fuel Tank Removal
WARNINGGasoline is extremely flammable and can be
explosive
under certain conditions, creating the
potential for serious burns. Make sure the area is
well-ventilated and free from any source of flame
or sparks; this includes any appliance with a pilot
light. Do not smoke. T ...