
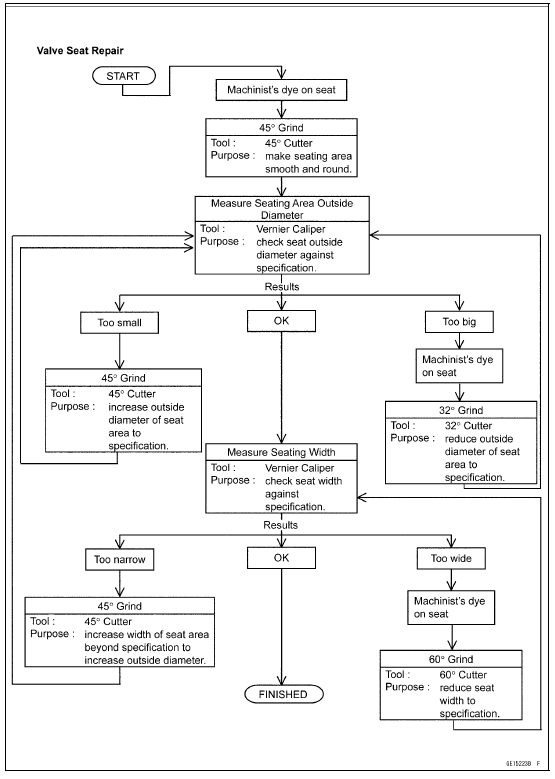
Grind the seating surface only until it is smooth.
NOTICE
Do not grind the seat too much. Overgrinding will reduce valve clearance by sinking the valve into the head. If the valve sinks too far into the head, it will be impossible to adjust the clearance, and the cylinder head must be replaced.
If the outside diameter of the seating surface is too small, repeat the 45¬į grind until the diameter is within the specified range.
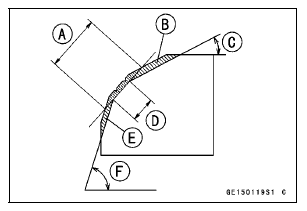
Widened Width [A] of engagement by machining with 45¬į cutter
Ground Volume [B] by 32¬į cutter 32¬į [C]
Correct Width [D]
Ground Volume [E] by 60¬į cutter 60¬į [F]
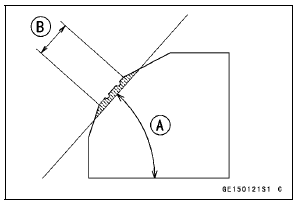
If the outside diameter of the seating surface is too small, repeat the 45¬į grind [A] until the diameter is within the specified range.
Original Seating Surface [B]
NOTE
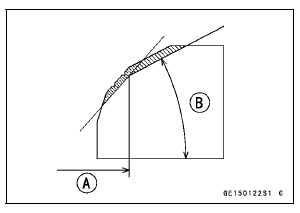
If the outside diameter [A] of the seating surface is too large, make the 32¬į grind described below.
If the outside diameter of the seating surface is within the specified range, measure the seat width as described below.
To make the 32¬į grind, fit a 32¬į cutter into the holder, and slide it into the valve guide.
Turn the holder one turn at a time while pressing down very lightly. Check the seat after each turn.
NOTICE
The 32¬į cutter removes material very quickly.
Check the seat outside diameter frequently to prevent overgrinding.
After making the 32¬į grind, return to the seat outside diameter measurement step above.
If the seat width is too narrow, repeat the 45¬į grind until the seat is slightly too wide, and then return to the seat outside diameter measurement step above.
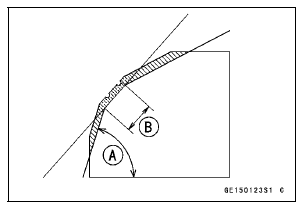
If the seat width is too wide, make the 60¬į [A] grind described below.
If the seat width is within the specified range, lap the valve to the seat as described below.
To make the 60¬į grind, fit 60¬į cutter into the holder, and slide it into the valve guide.
Turn the holder, while pressing down lightly.
After making the 60¬į grind, return to the seat width measurement step above.
Correct Width [B]
NOTICE
Do not lap the valve to the valve seat, using the grinding compound. It will come off oxide film treated surface of the valve.
 Seat Cutter Operation Care
Engine Sprocket Installation
Replace the sprocket washer and axle cotter pin.
Install the engine sprocket onto the output shaft.
Apply molybdenum disulfide oil solution to the threads
and seating surface of the engine sprocket nut.
Tighten:
Torque - Engine Sprocket Nut: 145 N·m (14.8 kgf·m, 107
ft·lb)
NOTE
...
Front Fork
The front fork operation and oil leakage
should be checked in accordance
with the Periodic Maintenance Chart.
For various riding or load conditions
the front fork can be adjusted for:
Spring preload
Rebound damping force
Compression damping force
WARNINGImproper fork leg adju ...
Front Wheel Rotation Sensor Signal Abnormal (Service Code b 42)
Measure the air gap between the front wheel rotation sensor
and sensor rotor.
Thickness Gauge [A]
Air Gap
Standard: 0.4 1.6 mm (0.02
0.06 in.)
If the measurement is not the standard, check each part
for deformation and looseness and correct accordingly.
If the measurement is t ...
