
Kawasaki Intelligent anti-lock Brake System (KIBS) offers enhanced braking stability (ABS performance equivalent to the current model) to supersportmodels, which pitch more than most motorcycles and also offers high-precision front and rear brake pressure control (high-precision ABS) for sport riding.
Precise control of the ABS operation decreases kickback to the brake lever and brake pedal during braking compared to the conventional system.
In addition to the front and rear wheel sensors in a conventional ABS, KIBS monitors a number of parameters: front caliper hydraulic pressure and information from the FI ECU (engine speed, throttle position, gear position, and clutch actuation).
KIBS uses an all-new BOSCH hydraulic unit which was designed specifically for motorcycle use.
The new design is small and light weight (45% less volume and 800g lighter than current units). The unit is located close to the motorcycle’s center of gravity, behind the engine cylinder and above the sprocket cover.
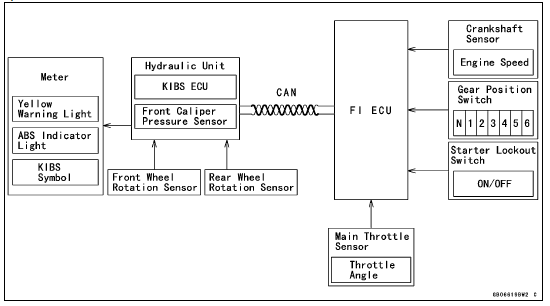
 System Components
Rear Wheel Removal
Raise the rear wheel off the ground with the stand [A].
Remove:
Cotter Pin [A]
Rear Axle Nut [B]
Washer [C]
Rear Axle [D] (from Right Side)
Remove the rear wheel rotation sensor from the caliper
bracket (see Rear Wheel Rotation Sensor Removal in the
Brakes chapter).
...
Rear Shock Absorber Installation
Replace the rear shock absorber nuts and tie-rod nuts
with new ones.
Tighten:
Torque - Rear Shock Absorber Nuts: 34 N·m (3.5 kgf·m, 25
ft·lb)
Tie-Rod Nuts: 34 N·m (3.5 kgf·m, 25 ft·lb)
When installing the rear shock absorber bracket [A], install
it so that the recess side [B] ...
Pressure Testing
Remove:
Upper Fairing Assembly (see Upper Fairing Assembly
Removal in the Frame chapter)
Radiator Cap [A]
Remove the radiator cap in two steps. First turn the cap
counterclockwise to the first stop. Then push and turn it
further in the same direction and remove the cap.
Install the ...
