
If any damage is found, replace the wheel if necessary.
 Tire Air Pressure Inspection
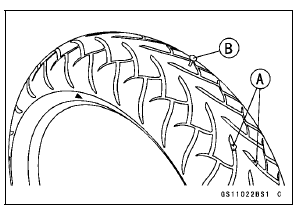
 Tire Tread Wear Inspection
Coolant Change
WARNINGCoolant can be extremely hot and cause
severe
burns, is toxic and very slippery. Do not remove
the radiator cap or attempt to change the coolant
when the engine is hot; allow it cool completely.
Immediately wipe any spilled coolant from tires,
frame, engine or othe ...
Storage
Preparation for Storage
Clean the entire vehicle thoroughly
Run the engine for about five minutes to warm the oil, shut it off, and
drain the
engine oil.
WARNINGEngine oil is a toxic substance. Dispose
of used oil properly. Contact
your local authorities for approved disp ...
Crankcase Halves Assembly
Install:
Crankshaft (see Crankshaft Installation)
Connecting Rods (see Connecting Rod Installation)
Using a cleaning fluid, clean off any oil or dirt on the mating
surface of the crankcase halves.
Apply liquid gasket to the mating surface of the lower
crankcase half as shown in the fi ...