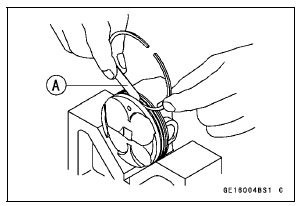

The rings should fit perfectly parallel to groove surfaces.
If not, replace the piston and all the piston rings.

Piston Ring/Groove Clearance Standard:
Top 0.03  0.07 mm (0.0012
 0.0028 in.)
Second 0.03  0.06 mm (0.0012
 0.0024 in.)
Service Limit:
Top 0.17 mm (0.0067 in.)
Second 0.16 mm (0.0063 in.)
 Piston Wear Inspection
 Piston Ring Groove Width Inspection
Stem, Stem Bearing Removal
Remove:
Upper Fairing Assembly (see Upper Fairing Assembly
Removal in the Frame chapter)
Front Fender (see Front Fender Removal in the Frame
chapter)
Front Wheel (see Front Wheel Removal in the
Wheels/Tires chapter)
Steering Stem Head with Handlebars (see Handlebar
Removal)
Fron ...
Self-Diagnosis Procedures
NOTE
Use a fully charged battery when conducting
self-diagnosis. Otherwise, the light (LED) and symbol
do not light or blink.
Turn the ignition switch to ON.
When a problem occurs with DFI system and ignition system,
the warning indicator light (LED) [A] goes on and
FI warning symbol ...
Sidestand Switch Operation Inspection
Raise the rear wheel off the ground with the stand (see
Rear Wheel Removal in the Wheels/Tires chapter).
Inspect the sidestand switch [A] operation accordance to
below table.
Sidestand Switch Operation
If the sidestand switch operation does not work, inspect
or replace the foll ...