
ESD ECU Communication Line Inspection
When the data (for status of ESD system) is not sent from the ESD ECU to the meter unit and ECU, the service code 3C is displayed.
The data is sent through the CAN communication line.
The service code 3C is detected with the meter unit.
The FI symbol does not appear in this error code.
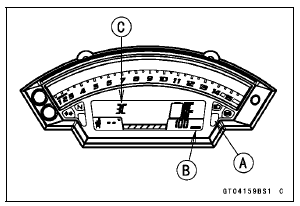
When the service code 3C is detected, the yellow warning indicator light (LED) [A] goes on, and the ESD warning symbol [B] and code of 3C [C] displayed on the LCD.

Special Tool - Hand Tester: 57001-1394
Wiring Inspection ESD ECU Connector [A] ←→ Meter Unit Connector [B] GY/BL lead (ESD ECU terminal 10) [C] LB lead (ESD ECU terminal 1) [D]
If the wiring is good, replace the ESD ECU (see ESD ECU Removal/Installation in the Steering chapter).
 Air Intake Solenoid Valve (Service Code 2d, Equipped Models)
 ESD (Electronic Steering Damper) Actuator Error (Service Code E2E,
ZX1000JD/KD)
ESD (Electronic Steering Damper) Actuator Error (Service Code E2E,
ZX1000JD/KD)Starter Motor Disassembly
Remove the starter motor (see Starter Motor Removal).
Take off the starter motor through bolts [A] and remove
the both end covers [B].
Pull out the armature [A] out of the yoke [B].
NOTE
Do not remove the circlip [C] from the shaft.
Remove the starter motor terminal lock ...
Seat Cover Removal
Remove:
Rear Seat (see Rear Seat Removal)
Remove the bolts [A].
Remove the upper seat cover backward [B] to clear the
hook portions.
Remove:
Front Seat (see Front Seat Removal)
Quick Rivets [A]
Bolts [B]
Seat Covers [C]
...
Crankshaft Removal
Split the crankcase (see Crankcase Splitting).
Remove:
Connecting Rod Big End Nuts [A]
Connecting Rod Big End Caps [B]
NOTE
Mark and record the locations of the connecting rods
and their big end caps so that they can be reassembled
in their original positions.
Remove the crank ...